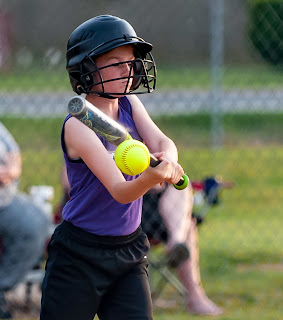
 With a combination of camera features, lens choice, lots of practice, and more than a modicum of good luck I got the shot to the right. To freeze that ball I used an ISO of 3200 which on the Nikon D700 has a reasonable noise level. I had the camera set for A (aperture preferred) with the aperture set wide open at f/2.8 giving me a shutter speed of 1/6400 sec.
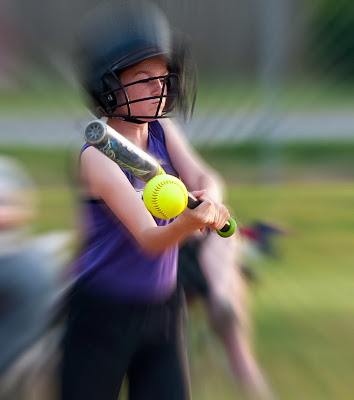
For the explosive photo editing to come, freezing the ball is not required but that and the fact that I caught the ball in the very center of the shot is what led me to us the method that follows. If the ball had been just a few inches higher or my granddaughters bat had been a smidgen lower she might have actually hit the thing, but were talking photography her not scores and she has hit many of those bright yellow-green softballs.
I've talked about Lightroom several times in this blog but the technique described here cannot be done in that application. What we are about to look into requires layers and Lightroom does not allow working on layers. The photo was actually edited in Photoshop but the exact same steps are available in Photoshop Elements and they work the same way and just as well. One difference is that the Photoshop version was processed in 16 bit mode and the Elements version had to be reduced to 8 bit mode to complete the steps. I may need to get back to this bit depth later but for now I'll just mention that almost everything you do with an image is done with an 8 bit version. Larger bit depths help during the editing phase.
The first step is with the original image and it can be done in Lightroom or any other editing program. I cropped the photo to the square shape putting the ball in the center and made minor adjustments to the brightness, sharpness, contrast, and vibrance.
 Once I liked the original image I moved to Photoshop and copied the background layer. Now I had two identical layers, one on top the other and I was ready to start. At this point in either of the Photoshop programs select the Background copy layer if necessary, then from the menu at the top of the screen choose Filter>Blur>Radial Blur. A small window will pop up. First choose the Blur Method by clicking on Zoom. Under Quality select Good and at the top move the amount slider to about 60. Note that there is no preview of the blur just a graphic representation of how much stretching can be expected. Click OK and the blur will be applied to the entire image including your subject. At the bottom of the Layers Pallet (top in Elements) click on the "Add Layer Mask" the little rectangle with the circle in the center. A White square appears along side the thumbnail image on the background copy layer which is the blurred layer. Click on the white square then press the letter "b" on the keyboard which will select the Brush tool. Hold the Brush over the ball and adjust the size by pressing the right bracket key "]" to make it larger or the left bracket "[" to make it smaller until it's the width of the bat or the size of the ball and click and drag the brush over the areas of the image you wish to be sharp. Note that I have painted over the ball, bat, face, and part of the arms of my subject. When the photo looks like you want it to your finished. Above is my "Explosive" result.
I hope this works for you, Comments and questions are welcome.
No comments:
Post a Comment