OK, vacation's over and it's time to get back to work. I apologize for having several post-free weeks. My wife and I were traveling the western US and enjoying the Grand Canyon and other sights. The current post features a photo taken in Arizona.
Here is a photo that sometimes happens. The meter emphasizes the wrong area, the photographer sets the wrong shutter speed or f/stop and the photo is drastically over exposed.
Like this:

Solution possibilities are many. If you've taken the shot as a raw image you may be able to just reduce the exposure in processing and save it. If you are familiar with "levels" and adjustment there could also work.
Here I show another possible help that you may not be acquainted with. Most photo editors allow you to work with layers. With layers you can, among many other things, combine two images. A building and a sky for example to replace a dull sky with a more interesting one. I will probably do that in a later post for those who haven't tried it. Here I will use another layer function that many are not aware of. In a photo editor (here I will use Photoshop Elements) if you place a photo on a layer on top of another photo you will only see the top photo. So why have a second layer? If we cut a hole in the the top layer the bottom layer will show through. If we change the reduce the opacity of the top layer to less than 100% the bottom layer will also show.
There is another option that is seldom used by those new to photo editing. At the top of the Layer's Pallet you will see the word "Normal" but if you click on "Normal" you will find 24 more "Layer Blend Modes" which control how a layer acts on the layers below it. In Normal mode the photo just lays on top of the layer below. We are going to use another of the 25 available modes it just a moment.
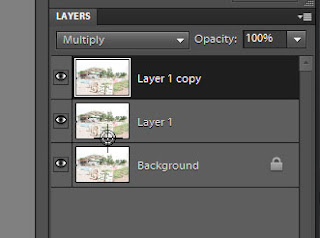 First I've copied the bottom layer. Typing [Ctrl J] creates a copy of the current layer and places it on top of that layer. In this case it becomes "Layer 1" and will show no change because it is just laying on top of the original. Now click on that word normal and choose "Multiply" and suddenly something has happened. The value of each pixel has been multiplied by the value of the pixel on top of it and becomes darker. Imagine a value of 2. 2x2=4 it's now twice as dark. The value 4, or 4x4=16 and it's now 4 times as dark. The Multiply mode takes a flat looking image and darkens it more in darker areas than it does in light areas, exaggerating the differences and darkening the photo as a whole. Sitting on Layer 1 and typing [Ctrl J] again creates the layer pallet you see here. "Layer 1" has been copied and has created "Layer 1 copy" has been created. Since Layer 1 was in the Multiply mode the copy is also and now 2 has become 2x2x2=8 and 4 has become 4x4x4=64 and the exaggeration has become much greater. Keep in mind that 1x1x1=1 so the brightest areas are still as bright. What we have created is this:
 It's not perfect, and a correct exposure would be better, but we have created a usable image from one that was very pale.
If you want to experiment further, placing a copy of an under exposed image (too dark) on top of itself and setting the blend mode to "Screen" will lighten the image in a similar manner and you may be able to salvage it as well.
Thank you all for reading this and it's good to be back on the blog. See you soon!
 First I've copied the bottom layer. Typing [Ctrl J] creates a copy of the current layer and places it on top of that layer. In this case it becomes "Layer 1" and will show no change because it is just laying on top of the original. Now click on that word normal and choose "Multiply" and suddenly something has happened. The value of each pixel has been multiplied by the value of the pixel on top of it and becomes darker. Imagine a value of 2. 2x2=4 it's now twice as dark. The value 4, or 4x4=16 and it's now 4 times as dark. The Multiply mode takes a flat looking image and darkens it more in darker areas than it does in light areas, exaggerating the differences and darkening the photo as a whole. Sitting on Layer 1 and typing [Ctrl J] again creates the layer pallet you see here. "Layer 1" has been copied and has created "Layer 1 copy" has been created. Since Layer 1 was in the Multiply mode the copy is also and now 2 has become 2x2x2=8 and 4 has become 4x4x4=64 and the exaggeration has become much greater. Keep in mind that 1x1x1=1 so the brightest areas are still as bright. What we have created is this:
If you want to experiment further, placing a copy of an under exposed image (too dark) on top of itself and setting the blend mode to "Screen" will lighten the image in a similar manner and you may be able to salvage it as well.
Thank you all for reading this and it's good to be back on the blog. See you soon!
.jpg)
.jpg)