.jpg)
.jpg)
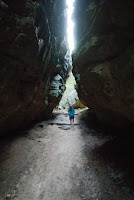
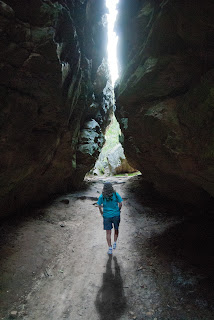
I found a shot I had taken about 4 years ago and thought that my wife's niece was in a position to detract from the shot. (left.) I wished I'd caught her closer to me in the slot canyon we were walking through."Then I thought "that's what Photoshop is for". This is not difficult to accomplish in recent versions of Photoshop and Photoshop Elements. The image to the right was created in Photoshop C6 and the one below was done in Photoshop Elements I treated the shadow differently, not because of any difference in the programs, but because I was playing with different looks and different ideas. There was no obvious shadow in the original shot but I felt it added drama to the final look and I think the bright light high in the slot makes it believable.
If you are familiar with either program I'll go through the steps I used to complete the change. I wouldn't call it a tutorial, but a clue as to how it was done. In both programs I zoomed in to the figure and the Quick Selection tool did a fairly accurate job of selecting her. I used the Alt key with Quick Select to remove areas that were selected outside the figure and removed the areas between the legs and between the arms and the body. Once I had her accurately selected [Ctrl C] copied her to the clipboard and [Ctrl V] pasted her right back on top of herself but on a new layer which I could manipulate separately from the rest of the photo. I then, with the Move Tool, (top of the tool bar), clicked on the figure and dragged the copy of my girl to approximately her new location. In the layer pallet (screen right) I clicked the little eye at the left side of Layer 1 and the moved figure temporarily disappears (clicking the eye again will bring her back). Then still in the layer pallet I clicked on the background layer (it changed color) making it the active layer and I was ready to get rid of the immovable original figure.
Using the Spot Healing Brush (near the center of the toolbar and looks like a Band-Aid), I selected Content-Aware at the top of the screen. I adjusted my brush size by pressing the [ and ] keys to make the brush smaller and larger and selected a size about 1/2 as wide as the figure. I then painted over the figure by holding down the left mouse button and painting until the entire figure is covered with the dark tint. If you let go of the mouse button early you will get an incomplete removal and the best thing to do is click the Undo arrow at the top right of the screen or just press [Ctrl Z] on your keyboard and start over. Once she was painted over I let go and the content aware feature of the Photoshops filled the area in with an approximation of the background based on it's awareness of the surroundings. The Photoshop programs have come a long way in automating this removal (that's the Content-Aware part) but I was somewhat unhappy with the result and I used the Clone Stamp tool to touch up the area where the figure no longer existed.
Now it was time to deal with my copied figure. Clicking on that eye again made the copy visible and clicking again anywhere to the right of the eye selected the layer for working on that layer. Since I moved my figure to a position closer to me, she needed to be larger. I could have left her the same size and the canyon would have looked larger (an artistic decision). With that layer selected I pressed [Ctrl T] to activate Free Transform. A rectangle appeared around the figure with "handles" at each corner and the center of each side. Clicking and dragging any of these handles will change the size and shape of the figure. I wanted to change the size, but not the shape, of my girl so I held the shift key and clicked and dragged a corner handle away from the center until she was as large as I thought she should be. While the rectangle was still there I clicked inside it and, clicking and dragging, adjusted her position to a good location. I then used my keyboard arrow keys to more accurately finish the positioning and pressed [Enter] to complete the Transform.
If you wanted to leave it without the shadow you're done. I want the shadow but this post is getting very long. I hope I've given enough detail to get you going. Next time I'll add the shadow.
.jpg)
No comments:
Post a Comment