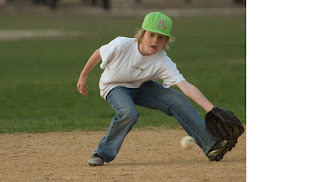
The only step in editing that comes before cropping is rotation. If you have turned your camera so that your photo is taller than it is wide, as I did here, your first step after uploading to the computer and starting the editing process is to rotate it so that your subject is not lying sideways. This photo has already been rotated, so its ready for cropping.
Cropping is probably the single most important step in editing. Look what happened here. My subject was standing near first base and I composed the shot vertically. I was waiting for something to happen to give me an interesting shot and it did. The ball came his way and he reached for it.
I had no time to rotate the camera. As you can see I just barely got him all into the shot. He's reaching for a ball that's almost on the ground, so suddenly he is not standing up and the photo would look better as a horizontal composition.
Lets see what the cropping tool will do. I used Photoshop Elements 10 and here is the result. While I was there I used Enhance>Adjust Color>Remove Color Cast. This adjustment has an eyedropper tool and since the boy was wearing a white shirt using the eyedropper and clicking in the white area made it white (it was a little tannish) and corrected the color in the rest of the photo as well.
With very little effort the composition and the color of the image were improved considerably. After each step in editing we ask can I make it better? Not just do more but actually improve the image. One rule of composition suggests that if your subject is moving, looking, or pointing more toward one side of the image than the other, there should be more space on that side of the image. Notice in this shot our subject is shoved up against the right side and that is the side toward which he is moving and looking. What can we do? We have a large area of out-of-focus grass to our left and not enough to the right so can we move some? Sure! First we have to add some space on the right to add dirt and grass. Image>Resize>Canvas Size will allow you to change the dimension of the canvas. It showed the size was, as I remember, about 7" high and 8" wide. I changed the 8 to a 15 which was way more than necessary. If I said OK it would put the extra space on both sides of the photo so I chose to anchor it by clicking the left pointing arrow which anchors the photo to the left side and adds all my new space to the right.
Using the fourth tool from the top (Rectangular Marquee Tool) I selected all of the photo from the top to the bottom and from the left edge to as far right as I could go without including my subject. Ctrl-C copies that area and Ctrl-V drops a copy of it right on top of the original but on a new layer. It will look like nothing has happened. Select the top tool (Move Tool) and a dotted rectangle will appear around the copy you made. Click anywhere inside the rectangle and drag the copy over to the blank area on the right side of of your evolving image. If you line up the line between the dirt and the grass the dirt area doesn't reach the bottom. Press Ctrl-0 (that's Zero) and you will be able to see the edges of the piece you're moving around. Clicking the little tiny handle in the center of the bottom of the rectangle and dragging it down. I stretched the copy until it was taller than the image and tall enough to reach from top to bottom after aligning the grass dirt boundary.
If you look closely you can see the line where the two portions of the image join. Disguising the joint should not be too difficult so let's see what happens by using the Clone Stamp Tool (a little more than half way down the list of tools and it looks like rubber stamp). All I did to create the final image was to use the stamp tool to copy a little from the left side of the joint over the line and a little from the right over the line. I did that in small overlapping pieces all the way up and down over the line being careful to avoid touching the glove where that ball is headed.
That's it. I know I've left out some detail to keep the length readable so if you have any questions put them in a comment at the end of the post.


No comments:
Post a Comment