Friday, August 31, 2012

HDR Revisited

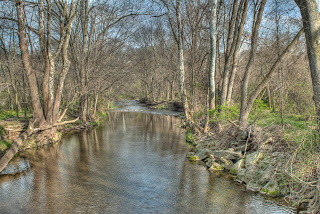
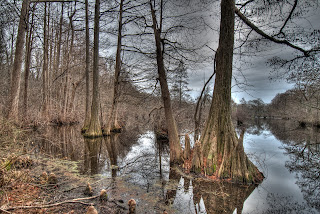
Realistic HDR looks much like it looked to me.
Back to HDR, this time more of a "How To". Check back to the earlier post for an explanation of HDR. Here I'll try to make it easy to do. You will need 3 or more exposures to create the image. One will be a normal exposure and half of the others will be darker than that one. The rest will be lighter. In general exposure can be changed by changing one or more sides of the "exposure triangle". The triangle includes ISO, aperture, and shutter speed. When we change exposures for HDR photos we normally change shutter speed. If you take a photo, change the shutter speed, take another, change the shutter speed, take another. It will work fine, but your camera will have to be on a tripod and you will have to change the shutter speed before each of the 3 or more shots, so the question arises: Is there an easier way? And the answer is usually yes.

Cyprus swamp slightly exaggerated HDR
Many DSLR cameras have a feature called "Bracketing". Bracketing has been used by photographers since the beginning of photography. Before shooting a photo you will not know exactly how the final image will turn out, so, many photographers took more than one shot, each exposed a little differently so after the film was developed they could choose the best exposure for the final print. Shooting more than one shot of exactly the same scene with different exposures is called "Bracketing". If your camera has this feature you can set the number of exposures (my Nikon can be set for from 3 to 9 shots). Most DSLRs have another feature which is "Continuous Shooting Mode" usually 5 or more frames per second.

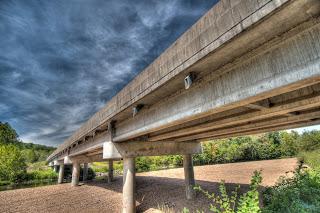
With more HDR exaggeration we have a dramatic sky
and incredible detail in the bridge. Many argue that this is
going too far, but I love the effect.
Let's use both of these modes together. If we set bracketing to create 5 exposures and turn on continuous shooting mode, we can take the 5 exposures in 1 second, maybe less. In many cameras the continuous mode is aware that bracketing is turned on and the camera will stop after the 5 exposures (or whatever number the bracketing is set for). Another feature that hasn't been mentioned is not in the camera but is in the software that creates HDR images. Many programs that create these images will align the images so that if the camera moves slightly in between shots the exposures will be adjusted so that they match before the combined image is created.

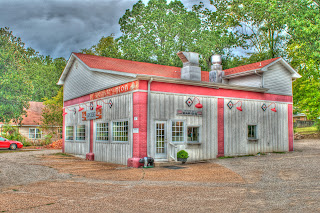
Extreme HDR exaggeration and I still like it. Here the effect
is that of a painting that idealizes the building.
Put these three things together and we have a way to create multiple exposure HDR photographs without a tripod. Hey, a tripod is still a good idea, but if all 5 images are taken in less than 1 second and our software will fix MINOR errors (note that minor is important here) we can get away without using that tripod every time. There are times when we realize that an HDR photo is what we want and we haven't brung the tripod.

It is the nature of the beast that as exposures get longer it is harder to hold the camera still enough to pull this off, so figure that "hand held" HDR shots work best in reasonably bright light. Yes you can kick up the ISO for dimmer light situations but if you look up the post here on ISO you'll be reminded that high ISOs can create noisy images. All of the images in this post were handheld and are sharp even at a much larger size.

Monday, August 27, 2012

Photo Editing Workflow

The term "workflow" can apply to many jobs. Here we apply it to editing a photograph, also known as post processing. If you're not familial with the term, "post" means after, so post processing means what is done to the image "after" shooting. I doesn't matter much which editor you use, as all of them must do the basic chores. Photoshop and several other top professional photo editors allow you to do more than the basic editors, but almost every editing function to improve your image and get it ready for online display or printing can be done with almost any editor. Many of the editors are free and most cameras come with one to get you started. If you want to purchase one they start in the $20 range and run to $650 for the regular Photoshop.

Workflow addresses what you do first and what you do next. Not every photographer uses the same workflow. The one we cover here will work and most of the steps explain why this particular order was chosen.

Step 1: Save a Copy
This step may not be necessary for all editors since some automatically create a copy of the photo for editing purposes so that you can always start over if things go horribly wrong. Things going horribly wrong is not uncommon so do make sure that either you or your editor make a copy and work on that.

Step 2: Rotate the Image if Necessary.
Some folks never think of rotating their camera. Most photographers, however, will turn the camera sideways for portraits and for other shots that benefit from a vertical composition. Some cameras will also detect the rotation and editing software will automatically rotate it. One way or the other if you see your photo laying sideways now is the time to rotate it.

Step 3: Crop
This is the first part of the workflow that is considered "editing". Using the Crop Tool select the portion of the image you want to keep. Many pros crop in the camera by zooming in or moving closer so it is not necessary to crop in post processing and none of the pixels are thrown away, which is what cropping does. Be careful here. You want to get rid of areas that detract from the image. You can also change the shape of the final product. If you want to make a specific size print such as 5x7, 8x10 or 11x14 set your cropping tool to create the correct shape. You can also create a square shape and many labs will print square prints for you. Decide the shape and crop to that shape leaving the most interesting parts of the image.
If you want to make prints of different shapes you may want to save a copy before cropping so that the copy can be cropped to fit the shape of the other print size.

Step 4: Correct Apparent Exposure and Color
At this stage you can't change the exposure but you can affect the appearance of the image. The controls that work best for this job are Levels and Curves (I will have to come back to them in a later post). Generally the Brightness and Contrast controls are heavy handed and are best avoided here. If the image is not drastically under or over exposed these corrections may make your image look good.

Affecting color is frequently easy using the Levels adjustment again. If an eyedropper is available in the levels control click on it and move your cursor over the image. Your pointer now usually looks like a small eyedropper. Find a spot in the photo that is pure white, black, or a neutral grey and click on it. If you have found a neutral spot and the lighting is reasonably even your color may be perfect on the first try. If it's not try to click on other possible neutral spots until one gives you a color balance you like.

Step 5: Portrait Cosmetic Improvements
This step is for portraits only and can be skipped otherwise. For portraits appearance of the skin is important. Small flaws such as spots, small scars, wrinkles are usually easy to fix with the clone stamp tool. Another trick is to create a copy layer and blur it slightly. Now create a layer mask and paint it so that eyes, lips, hair, and other important details show through from the non blurred layer. This will smooth the skin and create that model looking perfect skin. Another blurred layer trick is to create another copy layer and blur it considerably. This time create a layer mask that allows everything except the background to show through. Now you will have sharp eyes and details, soft smooth skin, and a very soft background. This can be a great help if your background is busy with distracting detail.

Step 6: Save This File
Corrections have been made cosmetic retouching and improvements are done. Save This File. Save it as a tiff file or use your software's native format. For example Adobe saves a .psd file. Do not save as a jpeg at this time.

OK, let's stop here. I'll cover more later but this is basic editing. The remaining steps are re sizing and sharpening and are done for each size print you will make separately. You will finish with a different copy of the photo for each size you plan to print and will start over from a copy of the file saved in step 6 each time you want to create a different size print.
Thursday, August 23, 2012

Converting Color to Black & White

Back when we were all shooting film a black & white photo was usually created by shooting black & white film. B&W film had a higher resolution than color and wonderful tonality. Now most of us shoot digital and the image shows up in our computers as a full color image. If we want black & white we must remove the color.

When shooting b&w film photographers found that shooting through a color filter changed the look of the final image. For example shooting through a yellow filter slightly darkened blue skies showed clouds more clearly and made landscape photos look more realistic.

Shooting through an orange filter darkened the sky even more making clouds stand out more and increasing contrast between shadowed areas lit by blue sky and highlight areas lit by orangeish sunlight. Finally shooting through a red filter produced and almost black sky and very dark shadows. A high contrast dramatic photo. A green filter lightened foliage and could improve the rendition of skin tones. All in all we had a lot of control over the final black & white image by shooting through colored filters.

Now comes digital and we now have an unlimited number of colored filters by applying mathematical changes to the levels of Red, Green, and Blue components that make up a modern color digital image. Some photo software let you apply colored filters just as was done in film day.
Add caption

The photos here show what is accomplished by Photoshop Elements with Enhance>Convert to Black and<br /> White.


The screen here shows adjustments allowed by Elements. It shows Scenic Landscape selected and the top B&W image is the result of that selection. By sliding the Green slider to the right in the next image the green was lightened and sliding the Blue slider left darkened the sky. Below  Vivid Landscape was selected and the blue slider was again slid slightly to the left to darken the sky.


In Photoshop Elements six effects are included. Each of them set the four sliders to preset positions. After selecting the one you like best you can then tweek the sliders to see if you can make an image that you like better.

Most current photo editing software now has similar black and white conversions that allow you a great deal of freedom to come up with an image you like.


Tuesday, August 21, 2012

RAW Pelicans In Lightroom

Wandering our local zoo these pelicans caught my eye. I grabbed the following shot in "P" or Program mode. The pelicans were in the shade and surrounded by green foliage. The "white balance" was also set to automatic and look what happened.

The white balance was fooled by the shade and the image is way too blue. The exposure is fine for the over all shot but since the pelicans are white they are a little over done. Had I shot a JPEG image I might have been able to salvage it but since I shot a RAW image it was very easy.

I loaded today's shoot into Adobe Lightroom and in the Development module I made the following adjustments.


  1. I cropped the image to minimize the extra space around the birds.
  2. I grabbed the White Balance eye dropper and clicked on a white area on the right pelican's back. My color was instantaneously great.
  3. I dropped the exposure by 0.7 stops to bring out detail in the birds.
  4. I darkened three sliders (slid them a little way left) including: Highlights, Whites, and Blacks
That's all folks. About 30 seconds of work and the following is the result:

A much better image with very little work. I could have decreased the exposure in the camera by adjusting exposure compensation by 2/3 stops and set the white balance manually to "Shade". That would have helped but would not have adjusted the contrast in the way the sliders in Lightroom did. Photoshop, Photoshop Elements and many other programs with RAW converters will work as well, but you have to learn how to use them. I'll try to get you started from time to time.

Have fun!


Monday, August 20, 2012

Shooting the Sky at Night


Taking a photo of stars is not difficult but it does require a tripod and you may have to look a little information up in your camera's manual (bummer). Also find a flashlight to take along. If you have one with a red filter or the option to use a red light that is best of all since the red light will not ruin your night vision. If you have a remote shutter release, take it along, but it is not necessary.

Next find a location away from city lights. Several miles outside of town and shooting in a direction away from town is best. It is nice if you can face an empty field so that a lot of sky is available.

The shot here was taken on a country road facing south. When I looked at the sky it was black except for the stars I saw no light at all. The camera saw the red/orange color along the horizon which I did not see.

Set your camera to it's manual mode, which is usually "M" on a round knob on top of the camera. Next turn off auto focus and manually focus your camera to infinity. The stars are too tiny for the camera to auto focus on. Find out how to set your camera's ISO and set it to 400.

Now you will need to check how to set the aperture and shutter speed. When you find out how to set the aperture set it to the smallest number you have. Probably something between 5.6 and 2.8. Remember that the smallest number is the largest opening, so we are letting in as much light as possible. Now find out how to set the shutter speed and set it to 30 seconds (see I told you you'd need a tripod).

Since your camera is in it's manual mode you may be able to do all of the above before you leave the house. Time is not critical but at least an hour after sunset is probably a good time to start. When you are in the field place you camera on it's tripod and point it in the direction of an interesting group of stars. In the photo above, if you're not a sky watcher, there is a group of stars about 2/3 of the way to the top and centered left to right that is a slightly sloppy rectangle of 4 stars and in the middle of the 4 is a diagonal line of 3 stars. This group is known as Orion and is a well-known winter constellation.

Now all is ready and all that is left to do is take the photo. Attach the remote release if you have it. If your eyes are good you may be able to check the focus by looking through the viewfinder. In any case press the shutter button very gently so as not to move the camera or if you have a remote release step back a little and press the remote. Stand still or walk gently away from the camera and wait the thirty seconds. If your camera has "long exposure noise reduction" and it is turned on you will now have to wait another 30 seconds while the camera makes a second 30 second exposure with the shutter closed. It finds out which pixels contain noise even without light and subtracts that noise from the image and keeps the noise level of the final image down.

After the 30 second exposure, and maybe the second 30 seconds, the image will appear on the cameras LCD screen and, if all has gone well, you will see stars. If you don't see as much as you hoped for you can try to increase the ISO to 800 or even 1600 if your camera allows it. Most digital cameras will not do an automatic shutter speed longer than 30 seconds and if you manually do a longer exposure you may start to see star TRAILS instead of stars. Nothing wrong with that some photographers do exposures of several hours or more to deliberately create longer and longer star trails.

Again: Have fun!


Friday, August 17, 2012

Histogram

If you're not familiar with the term "histogram" it is essentially a bar chart with no spaces between the bars. Photographically speaking it is a graphic representation of the exposure of a photo.
After you take a photo and look at it on the LCD most cameras will allow you to view the histogram. You will have to check your manual as to how to display it, but I imagine many of you have seen it accidentally. The image at left is a histogram of the tones in the photo below.
The histogram comprises 256 vertical bars. A bar at the extreme left represents the number of pixels that are completely black and a bar at the extreme right represents the number of pixels that are completely white. The histogram here shows that there are very few bars at the ends and that is, normally, what we want. Completely black or white areas have absolutely no detail and usually we would like to keep those areas to a minimum and here we have.

If we under expose our shot we have a histogram that looks like the one below
notice that the bars are shoved way to the left. Many pixels are either black or very close to it and therefore there is a lot of detail lost in the image, usually not what we want. Looking at the histogram after you shoot can let you know if you have an exposure problem which
might be hard to see if you are outdoors in bright light. In this image the center, left, and right areas show little detail and the whole photo just looks too dark.

In a well exposed photo we usually expect the histogram to be spread out to cover the whole range of dark to light. One exception to this might be a photo on a foggy day. Then the histogram may be a hump in the middle that does not reach either end. The image would then look very flat and low in contrast which is what you want in a fog shot.

Finally we have an example of an image that is over exposed. It is way too bright there a no pixels that are black and very few in all the darker areas of the image. On the bright side (right side) of the histogram is a large part of the image information the pure white and almost pure white areas have a lot of pixels and consequently
will have very little detail. The image looks very washed out. Only the areas that were very dark in the above image show much detail at all.

Bottom line here is to turn on your histogram display and look at it after you take a shot. There is no such thing as a correct histogram, but we usually want to avoid those that are shoved to one side or the other and especially those that then do not reach the other end.

For the more advanced shooter here is a warning. If you shoot RAW the histogram is NOT of the RAW image it is of the JPEG version of the image created by the cameras computer and may show over or under exposure where there is none. It can still be used as a guide but notice in the processing in the computer whether what you see in the histogram is a problem in the final image as it may not be. Here is an area where experience will be the best teacher.

Have fun!

Thursday, August 16, 2012

What if I Only Have a Point & Shoot Camera?

Wright Bros. monument at Kittyhawk, NC
Three things contribute more to a great photo than anything else. It has nothing to do with the price of your camera, the quality of your lens, or your technical skill at photography.

Here they are:
  1. Where are you  standing?
  2. Which way are you pointing the camera?
  3. When do you press the shutter?
I have chosen several photos for this post to prove my point. All photos included were shot, not with a DSLR, not with a point-and-shoot. They were all shot with my cell phone. It's a fairly new phone, an HTC Rezound with and 8MP camera and a digital zoom. These are small versions as posted on the blog, but viewed much larger on my monitor they also look good. My first digital prints were made from a 3.2MP simple point-and-shoot camera and some of them looked quite good at 11" x 14".
Low light levels don't seem to phase the Rezound and it maintains color and saturation. There are settings and a little knowledge of photography can extend the abilities of the camera giving you better exposures and color. As I recall, however, all of these were shot at default settings. And so, not requiring photographic knowledge.

They did, though, require deciding where to stand, which way to point the camera, and when to press the shutter. Note that while the flower is not an extreme closeup shot it is well focused and the color is very accurate. The camera is capable of focusing much closer which surprised me when I began experimenting on it's first day with me.

Left is a Little League ball field occupied at the moment by umpires preparing for the game. The sky was not quite as dark as it appears but it was quite dim and the primary sources of light are very visible it the shot. The cameras meter was not fooled by the bright lights. One thing I'm careful of with the cell camera is watching the screen as I aim the shot. Including more dark areas increases the brightness and, of course, including more bright areas decreases the brightness. It's a little like exposure compensation but it does mean that part of your composition decision is based on exposure.

You can have fun with even a simple camera. The photo here is of a string of white lights wrapped around a tree and a single torch. I took about 5 shots, wildly wiggling the camera and finally got this one. Not great art, but a fun shot and a dip into abstract art.

Do have fun, whatever camera you have. These were all done because I had my phone but not my real camera.

As sort of a PS I saw one more photo taken with my Rezound that I like a lot. By including a bright and interesting sky I was able to create a silhouette of the trees giving the photo an almost spooky look. See, I have fun too.

Thanks for reading, and please come back.

Wednesday, August 15, 2012

Creating Color Pops

Color Pops are a very trendy and frequently a not difficult photo editing effect. I'll describe the method that will work for Photoshop and Photoshop Elements. Before we get started it's important to understand a little about layers. Most photo editors, except very simple ones and strangely enough Photoshop Lightroom, support layers. You can imagine a layer as a photograph. Now lay on top of that photograph another one. Can you see the photo on the bottom? No, you can't see through this layer. In a photo editor, however, we can adjust the opacity of that top photo anywhere from 0% to 100%. Right now it is at 100% and nothing shows through. If we cut a hole in this layer we can see through the hole and see the photo below and that is exactly how we will create a Color Pop.

In the photo selected for this Pop we have three kids carrying balloons away from an outdoor birthday party. The photo we start with is in color, a Color Pop, as usually created, is a color image converted to  black & white. Some of the image, however, is left in color ... the "Pop". In this photo we'll leave the balloons in color and the rest of the image will be in black & white. We will do this first int the easiest way to understand and then we'll do it again in a way that's actually easier to do but has another step of understanding.
Before we go any further let's crop this shot down to the three kids and a little woods. OK, that's better, we didn't need all those cars and building and stuff, so let's get to work.

The "easy way". Using either Photoshop or Elements, Ctrl-J creates a second copy of the current layer. Now we have two copies of the same photo laying on top of each other. We see only the top copy now. The next step is to change the top image into a black & white image. Both Photoshop and Photoshop Elements have several ways to change a color image to black & white. That should be the topic of another post, or maybe several. For now let's do a basic change. In Photoshop Elements, from the menus, choose Enhance>Convert to Black and White. There are adjustments we can make at this point but as I mentioned, more posts later, right now clicking OK will create a serviceable monochrome image for our purposes. In Photoshop select from the menu Image>Adjustments>Black & White and click OK. There is an Auto button you can try if you like. In either case my Layers pallet looks like the one above, showing a Background layer in color and a Layer 1 (or Background Copy) in black and white. Remembering the description of how layers work, since the black and white layer is on top, that is all we see, but if we cut holes in that layer where the balloons are we will be able to see the balloons in color and we will have created a "Color Pop".

In the tool bar I've selected the Eraser Tool (or just press the letter E on the key board), I adjust the size of the Eraser Tool using the [ and ] keys until it is just a little smaller than one of the balloons. Carefully line it up with a balloon and click. And we now have a colored balloon and have created a "Color Pop". The balloon has a little grey edge so I click on it again and this time move the mouse around a little to cover the rest of the grey area.

I said I would cover two ways of doing this because this way if you erase too much in Elements you can keep pressing Undo (or Ctrl-Z) until you get back to before your mistake but in Photoshop you'll have to use the History Pallet and we don't want to go there now, so lets do this another way.

I click on the tiny Black and White thumb nail to be sure that layer is selected and, at the bottom of the layer pallet find the little rectangle symbol with a circle in the middle of it. Click that and along side your black and white image will be a white rectangle. This is a layer mask. Since I've just created the mask it is now selected. When the layer mask is selected the foreground/background colors at the bottom of the tool bar reset themselves to black and white. (they may have already been set that way but if not, they are now). I select the brush tool by typing "B", set it to a size I like with the [ and ] keys and begin painting over the balloons. The balloons change to color when I look at the small Layer Mask in the Layer Pallet I see black dots. When the Mask is selected and I paint I'm actually painting on the Mask. Anywhere I paint black the layer becomes transparent and shows the layer below it (in this case the color layer). This way if I make a mistake and paint outside the balloon I type the letter "X" and the brush changes to white and I paint over the black that is in the wrong place. Pressing the letter "X" changes the foreground/background colors and I can keep painting until I get it right. and I finally did. Here it is.

Tuesday, August 14, 2012

Photo Fun

Sometimes editing is just for fun. Here is a granddaughter shot. The ball was coming at her and she was jumping to get away from it. She didn't, and I got the shot a millisecond before it hit her knee. No damage beyond a bruise, but for the photographer a very lucky shot.

The unfortunate fact was that even with a long lens and a wide aperture she was far enough away, and close to the spectators in the background that the busyness detracted from the shot. Let's see what we can do with those people back there.

My subject here is sharp so that in Photoshop Elements or Photoshop the Quick Selection Tool does really make quick work of selecting my subject. As you move the tool over the subject more and more of her is selected, if any spots are missed, more "clicking and dragging" adds the missed areas. As you drag usually areas outside your subject will be selected. In this case the space between the bat and the helmet was selected. Hold the Alt key and click areas selected by mistake and they will be removed from the selection. Keep going with the Click and the Alt Click until the subject is accurately selected.

My plan here is to blur the background and let my subject pop but I've selected my subject and I need to select the background. Thank heavens the program makes that very easy. Click Select>Inverse and you've now selected everything but the subject. The keyboard shortcut for this is Shift-Ctrl-I. I use keyboard shortcuts whenever possible as they speed up the editing process tremendously. Notice when you use the menus any commands that have a shortcut show it to the right of the selection. Esc to close the menu, use the shortcut, and presto, you've begun to memorize another editing speed up.

Now we have all those distracting folks selected, what do we do? We blur them. From the menus choose Filter>Blur>Gaussian Blur. There are more and more ways of blurring being added to the menu but Gaussian works very well for this job. A small window appears with a slider labeled Radius. Make sure Preview is checked and you will see the blur on your image. Sliding the Radius slider to the right increases the amount of blur and remember this is "Photo Fun" so I went pretty crazy and slid it to about 50 pixels and here's what I got.

I did crop a little off the top and bottom and made an almost square image and now look at what we have. Absolutely no question of what is our subject. We see that there is something behind her but only imagination gives us a clue as to what it might be. Notice I was careful to keep the bat and the ball in my original selection because they are very important to the composition.

Blurring a little less would have made the result a little more realistic and believable as depth of field blur but I wasn't interested it reality I wanted a little fun and I was trying to impress my granddaughter. She loved it. I succeeded.

Monday, August 13, 2012

How to Take a Photo

I assume the title will get some folks attention but I want to start at the beginning. These are things that are completely automatic if you've been shooting for awhile, you don't think about them at all, you just do them. However, what if you started wrong and you automatically do something wrong every time. This is, then, a habit check; are we doing the best thing every time or have we developed bad habits.

First: Holding the camera. Your right hand should grip the camera firmly, three fingers on the front and thumb on the back, with the index finger free to press the shutter release. No matter what camera you have, your right hand grip should be able to support the entire camera weight and press the shutter, all with one hand.

Now put your left hand under the camera, or if you are using a long, heavy lens, put it under the lens itself. Hold your camera with both hands. The reason that your right hand grip should support the camera is to insure that when you press the shutter the camera will not move. Your left hand will also be able to support the camera so you have the ability to use your right thumb and fingers if you need to make adjustments. If your camera has a viewfinder, I recommend using it, not the LCD.

Now press the camera against the bony ridge across the top of the eye and press your elbows against the sides of your body.

Spread your feet about shoulder width apart, and you are about a stable as a standing person can be.

Second: Preparing to press the shutter. You need to prepare? Yes! Take a deep breath, let half of the air out and stop. Hold your breath. Your body moves as you breath and this will help reduce body, and therefore, camera movement. Holding a deep breathe makes you very tense, and holding very little air makes your body crave air. Holding it half way is the most relaxing way to stop breathing for long enough to press the shutter button.

Third: Pressing the shutter release. We assume here, your are using auto focus. Focusing the camera requires mechanical movement of parts of the lens which requires time so, press the shutter button half way down and hold it there for a moment. This will give the lens time to obtain sharp focus and be ready to go. Now when you get the perfect smile, the beautiful composition, or the peak of action, squeeze the button gently the rest of the way down and you have taken, what has a good chance of being a sharp image.

Now do this every time you take a shot and before long there will be no thought here and you can worry yourself about everything in all my other posts.


Friday, August 10, 2012

Cropping

The only step in editing that comes before cropping is rotation. If you have turned your camera so that your photo is taller than it is wide, as I did here, your first step after uploading to the computer and starting the editing process is to rotate it so that your subject is not lying sideways. This photo has already been rotated, so its ready for cropping.

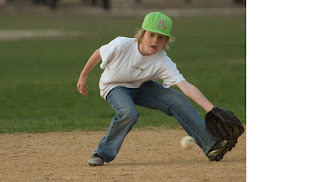
Cropping is probably the single most important step in editing. Look what happened here. My subject was standing near first base and I composed the shot vertically. I was waiting for something to happen to give me an interesting shot and it did. The ball came his way and he reached for it.

I had no time to rotate the camera. As you can see I just barely got him all into the shot. He's reaching for a ball that's almost on the ground, so suddenly he is not standing up and the photo would look better as a horizontal composition.

Lets see what the cropping tool will do. I used Photoshop Elements 10 and here is the result. While I was there I used Enhance>Adjust Color>Remove Color Cast. This adjustment has an eyedropper tool and since the boy was wearing a white shirt using the eyedropper and clicking in the white area made it white (it was a little tannish) and corrected the color in the rest of the photo as well.

With very little effort the composition and the color of the image were improved considerably. After each step in editing we ask can I make it better? Not just do more but actually improve the image. One rule of composition suggests that if your subject is moving, looking, or pointing more toward one side of the image than the other, there should be more space on that side of the image. Notice in this shot our subject is shoved up against the right side and that is the side toward which he is moving and looking. What can we do? We have a large area of out-of-focus grass to our left and not enough to the right so can we move some? Sure! First we have to add some space on the right to add dirt and grass. Image>Resize>Canvas Size will allow you to change the dimension of the canvas. It showed the size was, as I remember, about 7" high and 8" wide. I changed the 8 to a 15 which was way more than necessary. If I said OK it would put the extra space on both sides of the photo so I chose to anchor it by clicking the left pointing arrow which anchors the photo to the left side and adds all my new space to the right.

Using the fourth tool from the top (Rectangular Marquee Tool) I selected all of the photo from the top to the bottom and from the left edge to as far right as I could go without including my subject. Ctrl-C copies that area and Ctrl-V drops a copy of it right on top of the original but on a new layer. It will look like nothing has happened. Select the top tool (Move Tool) and a dotted rectangle will appear around the copy you made.  Click anywhere inside the rectangle and drag the copy over to the blank area on the right side of of your evolving image. If you line up the line between the dirt and the grass the dirt area doesn't reach the bottom. Press Ctrl-0 (that's Zero) and you will be able to see the edges of the piece you're moving around. Clicking the little tiny handle in the center of the bottom of the rectangle and dragging it down. I stretched the copy until it was taller than the image and tall enough to reach from top to bottom after aligning the grass dirt boundary.

If you look closely you can see the line where the two portions of the image join. Disguising the joint should not be too difficult so let's see what happens by using the Clone Stamp Tool (a little more than half way down the list of tools and it looks like rubber stamp). All I did to create the final image was to use the stamp tool to copy a little from the left side of the joint over the line and a little from the right over the line. I did that in small overlapping pieces all the way up and down over the line being careful to avoid touching the glove where that ball is headed.

That's it. I know I've left out some detail to keep the length readable so if you have any questions put them in a comment at the end of the post.

Thursday, August 9, 2012

When should I use flash?

I always surprise my photography classes by suggesting that an important time to use flash is when taking photos of people in bright sunlight.  Huh! Bright sunlight creates harsh shadow on the face. Most cameras when the flash is fired in bright sunlight act as fill flash. A small built in flash cannot over power the sun and become the main light, but it can fill in shadows.

Here is a photo of a young friend sitting in mottled sunlight. The light was very uneven and the shadows were not pleasant. I merely turned on the flash and presto. A pleasing portrait of the girl. A pair of photos below show another example of fill flash. In the first photo the flash was not fired. In order to show a little detail in the foreground, the sky is slightly over exposed. In the second image the flash lit the tree in the foreground and allow the sky to be exposed less and therefore show more rich color.

The bottom line here is: Just because there is plenty of light doesn't mean there is no reason to use a flash. Think of it as a way to even things out. With people lighten shadows. Or if a person is lit by the sun from the back, your flash can add light to their front and even things out. In the tree shot most of the light is in the sky in back of the tree and the flash again evens things out by adding light to the tree front.

Wednesday, August 8, 2012

Should I Shoot RAW?

I guess we'd better start of with the "What is RAW?" stuff. All photographs from digital cameras start life as a RAW image. The shutter opens and light begins to flow through the lens, is focused on the sensor, and begins filling up the pixels with photons. When the shutter closes the data collection is complete; each of the pixels contains a number of photons corresponding to the brightness of the light that struck it. Now the camera counts the number of photons in each pixel and creates an electronic version of the image. At this point in time the image is monochromatic, it has no color. Your camera's sensor cannot see color, it only sees brightness. If your camera is set to store the image in RAW form this is the image that is stored. The RAW image however, cannot be displayed; the image on the back of the camera is a full color image and it looks pretty much like a print of the photo might look. The RAW image would be very dark and have no color.  The camera processes the RAW data, interprets the color, brightens the image, sharpens it, and creates a JPEG version, and that is the image that is displayed on your LCD. If you choose to shoot JPEG images this the image that is stored on your memory card. Some cameras will allow you to save both the RAW and the JPEG images and give you the best of both worlds.

This tells you a little about what RAW is, but nothing about whether you should use it. I'll tell you up front that I only shoot RAW so you might consider me a biased judge. Those who are against it usually argue that it's only benefit is to save you when you take a bad photo. It can do that. Much more information is saved with the RAW image and if you've under exposed or over exposed you can adjust it quite a bit more that you can adjust a JPEG photo. White balance of a RAW shot is set in your computer, not in your camera and can therefore be adjusted any amount in any direction. Since more data are collected changes in contrast, vibrance, saturation, and sharpness have a much larger range of adjustment than a jpeg image. Pseudo HDR shots can be created by processing two or three versions of the photo and merging them back into one image.

Why shoot JPEG? These shots are processed in the camera they come out as much smaller files so that your memory card can store two or three times the number of images as RAW shots. Also, as they come out of the camera processed, you can go to a local drug store and print them directly from the memory card. You can email them also from the card. If they are correctly exposed and white balanced they come from the camera pre-cooked and ready to eat. The reason that the files are so much smaller is that the camera uses what is called "lossy compression" the camera looks at a batch of pixels and if it determines that they are very close to the same color and brightness it saves one and throws the others away. Most cameras offer three levels of JPEG compression they are labeled by quality and the most honest labeling is Low, Medium, High. Some may call them Normal, High, and Super High, or some other combination but they all mean the same thing. The lowest one throws away many more pixels than the highest and leaves you with fewer pixels to adjust with later.

Enlarge a JPEG image and look in large evenly colored areas like a cloudless sky. If you see rectangular areas you are seeing JPEG compression artifacts and you need to choose a higher setting next time. You can't fix it now. Again, a well exposed, correctly white balanced photo saved as a JPEG image is excellent. Many pro's shoot them to speed up the time from shoot to delivery. They depend on their cameras and their ability to deliver a high percentage of usable shots. Your camera in automatic mode will also deliver a high percentage (not as high as that pro I referred to) of usable (and here you may not be as picky as the pro's clients) photos. You don't have to shoot RAW to get great photos, but there are some advantages.

Tuesday, August 7, 2012

A Raw Save

Here is a example of what shooting in RAW can accomplish for you. I mentioned in an earlier post that there is a much larger range of correction that can be done with a raw image, so let's take a look.
The image above is a example of extreme lighting conditions. A normal bright sunny day at the zoo, but let's see what happened. Bison don't come when you call them and they don't respond to "Could you move a little to the left". They seem, at least in my experience, to not be very active even though the sign says that they can run 40 mph. I was not using a long lens so I couldn't crop tightly. The foliage and flowers upper right are in the shade and very dark. the sandy dirt lower is in bright sun and being very sandy soil is light in color and highly reflective.


While the exposure of the animal itself is mostly good, the soil behind him is sufficiently over exposed to show almost no detail. the foliage barely shows the flowers and much of it is very close to black.


The raw converter (here I used Lightroom) has six sliders that can sometimes nearly work miracles. The first is exposure which I didn't touch. The exposure is fine. Making it darker to salvage the sandy soil would have driven the subject and the foliage much too far into the dark. Likewise making the exposure lighter would have turned the soil close to pure white. The next slider is contrast. Reducing contrast helped bring out detail in the darker and lighter areas but the image looked over flattened so I reset that slider. The next group of sliders starts with Highlights. Highlights defaults to zero and has a range of + or - 100. I set it to -100. It took moving it all the way to dark to recover the bright sand on the left. Shadows has the same range and setting it to +93 brought back detail in the foliage. Slider three, controls Whites and this was another that I left at the default zero. The final adjustment is Blacks and setting it to -57 took the very darkest areas and brought them down to black or almost so giving the image a far more contrasty look while not increasing contrast in the areas that the other sliders had brought within a reasonable range.

Over all, I consider that this was not a save of bad shooting. It saved an image that could not have been made at that time with out adding many pounds of lighting equipment to the effort.

Monday, August 6, 2012

What is Aperture?

This one is not complicated but the numbers will look a little crazy so bear with me when we get to the numbers, please. In the description of shutter speed I used the analogy of a pipe delivering water and the spigot as the shutter which can open for most any amount of time. Now let's look at that spigot a little more. Instead of just on and off remember that spigots usually can be turned on just a little, just a little bit more and of course, all the way on. Now were looking at the spigot as an aperture, the wider open it is the more water comes through every second. So opening the valve a little way for one second will let in a certain amount of water; opening it twice as far (one stop more) will let in twice as much water in the same one second. Like before we imagine that the water is light. More water means brighter photo so now using our spigot analogy we can control how long the water flows in (shutter speed) and how much flows in at a time (aperture). One more thing. If we replace the pipe with a larger pipe, we've bought a faster lens.

If you're not familiar with the term "faster lens" it refers to the largest aperture of a particular lens. Let's get into those crazy numbers mentioned earlier.

Here they are:

1.4 2 2.8 4 5.6 8 11 16 22 32

This is a list of all the apertures you're likely to find on a DSLR camera lens and more than you'll find on most lenses. In a sort of reverse logic the larger numbers represent smaller apertures. Actually if you think of them as the bottom number in a fraction you can see why this is true. 1/2 is twice as large as 1/4 and if we assume the "1/" and leave it off we are left with 2 and 4 with 4 representing the smaller fraction. What we are actually leaving off, and you will sometimes see it left on, is "f/" so you may see an aperture referred to for example as f/8. "f" represents the focal length of the lens.

Aperture refers to the size of the "hole" we are allowing light to pass through. The "hole" is adjustable. Older lenses have a ring on them that you can turn and stop at numbers like those on the list above. Newer lenses have eliminated the ring and the adjustment is made from the camera Command Dials.

Let's look at a common "kit" lens like the one that comes with the Nikon D3100. It is a zoom lens that zooms from 18mm to 55mm (we'll get to those numbers in a later post) the largest aperture on this lens is f/3.5 or just 3.5. That size is between 2.8 and 4 on the list above and is not an even "whole stop" which doesn't hurt a thing. The adjustable aperture can only get as large as the lens diameter so to get larger apertures (smaller numbers remember) you need to have a larger piece of glass at the front. Larger glass means a larger lens, a heaver lens, a faster lens, and a more expensive lens. The "kit" lens mentioned sells currently for about $125. "Kit", by the way, refers to lenses which are included with the camera. The faster Nikon 24mm to 70mm f/2.8 lens is about $1,900. Faster lenses go up in price quickly.

Just like ISO, and Shutter Speed, changing the aperture (in manual mode) by one stop makes the image one stop brighter or one stop darker by the same amount as the other two. We can depend on "one stop" being the same brightness change no matter how we make it.

Also just like changing ISO added or removed noise from a photo and changing shutter speed changed the amount of blur of moving objects; changing f/stops or aperture has an other effect also.


Both photographs here have the same exposure so the brightness is the same, but a big difference in the look. Also in both shots I focused on the tree branch which was just a few feet in front of me. I was shooting in Aperture Preferred Mode (A or Av) which automatically controls exposure (so they are both the same brightness) but allows me to control the aperture. The photo left was shot at f/22, the one on the right f/2.8. The difference is called "depth of field" and sometimes "depth of focus" (which is technically incorrect, but I ain't gonna split hairs). Small apertures like f/22 keep more of your photo in focus and is commonly used for landscape photography where we usually want to see everything sharp and detailed. Large apertures offer a "shallow depth of field" which focuses attention on your subject and softens the background and makes it less distracting. Large apertures are frequently uses for portraiture.

In the shot here I catch my granddaughter's number and the background is softened to the point where is does not interfere with my intentions of showing my girl, the ballplayer, and the number one. The blond hair tells me who she is.