Sunday, July 29, 2012

Shutter Speed

Shutter speed is the second side of the Exposure Triangle. When you are in the Manual Mode anytime you change the value of any side of the Exposure Triangle the photo you take will get either brighter or darker. Last time we looked at ISO. If you increase the ISO setting from 100 to 200 the photo will be one stop brighter going from 200 to 400 will make it another stop brighter. OK, now it's time to look at shutter speeds. Imagine your lens like a pipe with water coming out and pouring into a bucket. More water in the bucket is like more exposure and more exposure means a brighter image. Our shutter acts like a faucet on the pipe. If we open the faucet for one second we will get a certain amount of water (brightness) in the bucket. If we open the faucet for two seconds we will get twice as much water (or brightness) in the bucket.

That's how shutter speed works in a nut shell. The longer the shutter is open, the more light is allowed to strike the sensor, and the brighter the image will be. Let's see what those shutter speeds are. A typical DSLR camera will automatically expose a photo for up to 30 seconds. If you use a speed that slow (long) your camera better be on a tripod. There are even ways to expose a photo for minutes, or hours, but right now let's assume your holding the camera in your hands and you want to point it at something and take a photo. Now what shutter speeds are we talking about.

Most photographers can learn to hold a camera steady enough to shoot at 1/60 of a second. From there as the light gets brighter, or the lens gets bigger around, the shutter speed can increase to 1/125 second, 1/250, 1/500, 1/1000, 1/2000,and maybe even 1/4000, or 1/8000 second. Back to "stops" again each of those speeds is one stop less than the one before. For example 1/2000 of a second is only half as long as 1/1000 of a second and therefore will expose only 1/2 as much. Remember 1/2 as much is one stop less (darker) and twice as much is one stop greater (brighter).

1/320 Sec. Stops 'em on Second Base
When we looked at ISO we looked at what else happens when we change it. With ISO remember as the ISO gets higher, while the image gets brighter, the noise gets greater. Well, what happens when we change shutter speeds? The less time the shutter is open the darker the image (exposure) but the other effect is that if the shutter is open for a shorter time movement has less effect. What movement? Well if I'm holding my camera very still and take a photo of a speeding auto, a slow shutter speed will show me a photo of the car as blurry because my shutter was open for 1/60 second and during that time let's say the car moved a foot so I see a one foot long blur. If I shoot the same car at 1/1000 of a second the car will move less that 3/4 inch so I still have a blur but 3/4 inch is much less noticeable than a foot. If my image shows the entire length of the car and space in front and behind it then 3/4 of an inch may not even be visible and I will have a very sharp image.
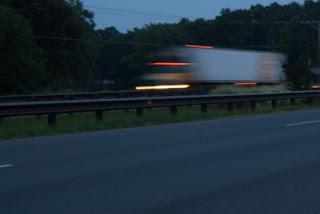
At 1/5 Sec. Truck Shows it's Moves
The car is a example of subject movement. The other movement we worry about is camera movement. You can not hold a camera perfectly still. A telephoto lens adds to the problem since as it magnifies your subject giving you a close up of a deer at 50 yards,  it also magnifies your camera movement. So, a higher (faster, shorter) shutter speed reduces blur from camera movement as well as blur from subject movement. So far it sounds like faster shutter speed are better, and in many cases that is right. However, many things we photograph do move and we are taking still photographs. If we look at an 8 x 10, glossy, full gcolor photograph, hanging in a frame of our favorite NASCAR moving at 120 miles per hour how do we know it's moving at all. The only way a still photograph can imply motion is if something is blurry. If as in my first example I put my camera and use a slow shutter speed everything will be sharp except the moving car(s). Anyone looking at the photo will know that the car was moving and the longer the blur the faster it will look.
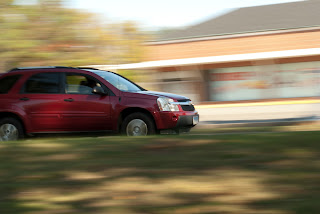
This car was moving about 30mph and the camera 1/30 sec.
Wait a minute, this is my favorite NASCAR, I want it to be sharp not blurry, but yeah, I want people who look at my photo to know it was moving 120 mile per hour, so now what? Combine and synchronize subject movement and camera movement. At right with the cameras shutter speed set at 1/30 sec I aimed at the car when it was 3/4 of a block down the street. I followed it as well as I could and when it was nearly in front of I pressed the shutter. I kept following the car as the exposure was made to keep it as sharp as I could. Above we have a sharp image and a blurred truck and here it's a blurred image with a sharp car. Two different was of implying movement in a still image.
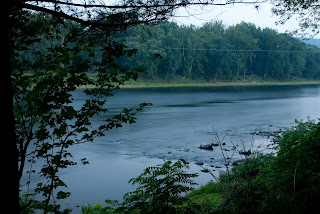
Another use of a slow shutter speed with no noticeable blur is seen here in a full 30 sec. shot of the Hudson river. What the long exposure creates here is a smoother, more peaceful river than it would appear in a faster shutter speed. Learn to use your camera's Shutter Speed Preferred Mode (S or Av) and experiment with various speeds.

Very important: "There is no cost to digital experimentation", delete what you don't like.

What is ISO?

There are three settings on your camera which control exposure they are ISO, shutter speed, and aperture. Together they are frequently called the Exposure Triangle. ISO refers to the International Organization for Standardization (I know that should be IOS). I've looked and I have not yet found a language in which the name would come out ISO but it is what it is and we've dealt with it since 1947.

In photography it refers to sensitivity to light. In film days we bought 100 speed film, those of us who shot slides sometimes shot 25 speed film. If we were going to shoot inside in dim light we bought 400 speed film. In those days the film was usually labeled ASA (the American Standards Organization) and at a time I've lost to memory the boxes began saying ISO instead of ASA. The numbers didn't change. ASA 100 and ISO 100 are the same speed. ISO and Speed measure how sensitive the film is to light. The higher the number the more sensitive the film.

Remembering "What is a Stop?" ISO's double to make them one stop more sensitive. If you are shooting at ISO 100 and you change it to ISO 200 (this only works in Manual mode) your picture will be one stop brighter; change to ISO 400 and it will be 2 stops brighter. In automatic modes changing the ISO causes the camera to automatically adjust the shutter speed, aperture or both (these being the other two sides of the Exposure Triangle) and the image stays the same exposure (brightness).


In digital photography the numbers still have the same meaning only now it refers to how sensitive the digital sensor is to light not the film. In film days if we wanted more sensitivity we removed the film from the camera and put in a more sensitive film. In digital cameras we can change the ISO for each shot if we want to, because there is no film to change.

To truly change the sensitivity of the digital sensor we would have to replace it with a more sensitive one. Every sensor has a "native" sensitivity that cannot be changed. So why do we think we can change it? What comes out of the sensor is an electrical signal and electrical signals can be amplified. If we are listening to music and want it louder we "turn up the volume". If the picture is not bright enough we "turn up the volume". In dim light the signal coming from the sensor is weak so we amplify it which unlike sound doesn't make it louder, it makes it brighter. We have "effectively" increased the ISO.

The next question is: "How much can we do that?" and that answer changes as improvements are made in newer camera models and also with the price of the camera. Here is the problem; every electrical circuit contains two types of information, "signal" which is what we put there and want there, and "noise" which is what we don't put there and really don't want there but it's a physics problem, where there is signal, there is also noise. In digital photography the signal is the picture and noise shows up, mostly in dark shadow areas, as colored flecks or spots. When we amplify the signal, the picture gets brighter. But we can't just amplify the signal, we also amplify the noise and it gets worse. we get more colored flecks until it gets to the point where the image is worse than we are willing to allow, and then we have passed the "How much can we do that?" point.

So where can we expect to find the point. Most DSLRs on the market have a "native" ISO of 100, some start at 200, also most have little problem getting to 1600 ISO without excessive noise. There are quite a few cameras that will go higher than this and the highest speeds are frequently called extended or expanded range which means your images no longer appear "noise free". The Nikon D4 as an example will hit 12,800 ISO without using the expanded range, but it is a $6000 camera and for that money the expanded range will take you to 204,800.

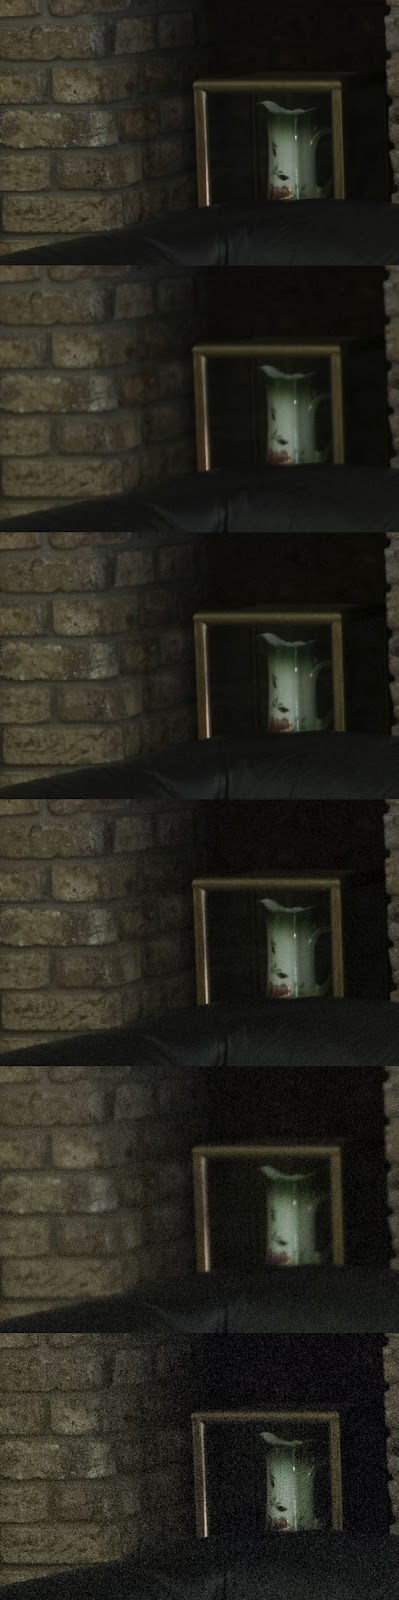
The series (above right) is the section outlined in yellow (left) of photos that were taken with a Nikon D200 and from the top down were shot at ISO 100, 200, 400, 800, 1600, 3200 each is one stop faster than the previous. The 3200 was an extended range ISO.

What does this all mean in practical terms? The photos were taken on a cloudy day inside and the room was not very bright. At ISO 100 the shutter speed was 1/5 second and probably could not have been hand held. In fact until the ISO was all the way to 3200 (that's 5 stops faster) the shutter speed was too slow for someone my age to attempt without a tripod. The bottom line is that higher ISOs allow faster shutter speeds and save you from setting up a tripod for many shots.

What is a Stop?

Origin of the Term


I would like to explore exposure more. In several places in earlier posts I have used the term "stop". For those new to DSLR style photography and making adjustments yourself, the term may puzzle you. If you look up the word "stop" in the dictionary you may find a reference to "photographic stop" but I had better luck looking up "detent" (which my current spell-checker says is not a word). Imagine a wheel with small notches like the one at right. On top rests a spring with a vee shaped end which fits the notches. When you turn the wheel it will try to stop each time you reach a notch. These notches are called detents and sometimes "stops" with them you know exactly how far you've turned the wheel and you can find the same spot again any time.
You can also stop in between if you want to.

Use of the Term in Photography

In photography one stop more exposure is two times the exposure and one stop less exposure is 1/2 as much exposure. The question now is why was double and half chosen as a normal difference between exposures. Double seems like a long way. Look at the three images below. The center one is what I chose as the best exposure. The one to the left is twice the exposure or one stop greater and the one to the right is 1/2 the exposure of the center one.


The difference between the exposures is a comfortable difference to work with. It is noticeable but not extreme. As with the wheel above your camera can be set in between stops if you feel that a whole stop goes too far. Most cameras adjust to 1/3 stops and not many photographers find a need for a finer adjustment than that.

There are three adjustments on your camera that affect the exposure so come back and we'll tackle them one at a time.

Friday, July 27, 2012

White Balance

Well, of course we'll start off with "What is white balance?" If you walk out on a bright sunny day and someone hands you a piece of printer paper, it looks white. Later if you are sitting on your couch and the lamp next to you has a 60w bulb in it and you are handed the same piece of paper it will still look white. What your camera notices is that the paper looks a lot bluer outside and very red/yellow under the 60w bulb, under florescent lights it looks much greener. Your brain is so used to these color changes that it compensates for the color differences and the paper usually looks just as white in all the different lights. The White Balance in your camera must be adjusted to compensate for these differences in light color. Most cameras are set on Automatic White Balance and like most other camera computer controlled operations it works very well. But like exposure, automatic is not necessarily "correct" and correct is not necessarily what I want. Your camera will let you set the white balance to the type of light: sunlight; cloudy, shade, incandescent, fluorescent, open shade. Many
cameras will allow you to set the preferred "color temperature". I don't want to get to deep into that subject but briefly: color temperature is measured in Degrees Kelvin. Daylight with the sun shining is usually about 5500°K, that reddish/yellowish 60w bulb more like 2500°K, and open shade about 10,000°K, or the lower the temperature the redder the light and the higher the temperature the bluer the light.

Take a photo on a cloudy day with your camera set to Automatic White Balance, then reset the camera to Cloudy and compare the two images. Usually the shot set to Cloudy will be redder than the other. Just to add confusion here artists refer to redder light as being "warmer" and bluish light as being "cooler", the opposite of color temperature numbers which go down for red and up for blue. This means that when you set your camera to Cloudy and the image looks a little redder we say that the image in "warmer". Photos of light skinned people usually benefit from a little added warmth, the skin just looks healthier than the sometimes bluish color of photos taken in the shade. Anytime you are not pleased with the color of the image you see on your LCD try setting the white

balance to match the light you are shooting in. Also try setting the white balance to the WRONG setting to see what happens. If I set my white balance to Incandescent and take photos on a sunny day the photos will  be very blue. Now if you use Exposure Compensation and set the exposure to say -2 the photo could look like it was taken by moonlight.

The photo here (Granddaughter Saylor) was taken in the shade during the day. The color temperature was probably about 6500°K but the camera calculated 4300style="background-color: white;">°K and the photo at the top was created. It's not bad but is a little on the cool side. Since the photo was taken in the camera's RAW mode the color balance is actually set in the computer not in the camera so I was able to change it. In the second I set the color temp to 6500°K or, the approximate temperature of open shade and created the second version which is much warmer (that's redder) and a more attractive skin tone. Just to fill out the group I set the color temp to 2850°K or a middle tungsten light and the image is a very cool blue.

I will get back to RAW in a later post but if your shooting jpegs (most people and a lot of pros do) remember to check the color and set the white balance to the type of light you are actually shooting in. You may be much happier with your photos.

Carnival at Blue Hour

Last night we took grandchildren to the Sharptown Fireman's Carnival. They are old enough to roam alone and I took the opportunity to do some blue hour shots. If you're not familiar with the term "blue hour" it is loosely defined as the hour before sunrise or the hour after sunset. A major advantage of blue hour photography is that you can get night shots without a plain black, nothing sky.

It's not difficult to take shots like the one at right. I wanted the look of night and I wanted the rotation of the lights and the blurred Ferris wheel to be visible. It was 7:30 in the evening and not quite as dark as the photo looks. Had I shot in "P" or Program mode my shutter speed would have been too fast to show the amount of blur that I wanted. I chose, instead, "A" or Aperture Preferred mode. In this mode I choose the aperture and the camera's computer figures out the shutter speed.

Since in this mode I was still allowing the camera to calculate the "correct" exposure, I stepped in. The camera would think "it's dark, I'll lighten it up". The photographer (me) was thinking "it's a little too bright and I want a night look so I'll darken it". I held down my little Exposure Compensation button (see earlier post) and dialed in 2 stops of under exposure. (That turned out to be a little much and I brightened it, just a little, in Lightroom). This gave me the night look I wanted, but I still had to set the aperture. I wanted a slow shutter speed so I had already decided to set the ISO to 100; and to make sure the shutter speed was slow I chose a small aperture f/22. By lining up my shot I could see in the viewfinder that my shutter speed would be 1.3 sec and the shot here is what I got.

Let's be honest here. I took this shot four times; f/8, f/11, f/16, and f/22. Since the camera's computer was calculating the exposure, the four shots were identical in brightness because the camera kept changing the shutter speed as I stopped down (made smaller) the aperture. I kept going to smaller apertures to force the camera to use slower shutter speeds, to increase the amount of blur. At f/22 I got what I wanted and stopped.

One final point. With a 1.3 second exposure ya gotta have a tripod and I didn't. This was "night with grandchildren" not "photo expedition". Sooooo there was a nice white, plastic picket fence near by and could hold the camera against a fence post (keeps the camera still) with my holding hand sitting on the fence rail (keeps my hand still) and get a sharp shot.

Some might disagree, but I think night shots are very forgiving so, try them. Generally you will need a tripod but as you see sometimes and handy stump will suffice.

Thursday, July 26, 2012

Exploring Exposure

What is exposure? Well the answer is "sorta" easy, it's how dark or light the photo is. But how about: "What is correct exposure?" Now it's getting a little tougher. I'd say there is absolutely no such thing as correct exposure. So, what is it that my camera's Automatic exposure mode is giving me? Your camera is working very hard to give you a "reasonable" exposure, one that includes detail in as much of the picture as possible. If the scene contains areas that are much brighter or much darker than average or maybe both kinds of areas, there will be no single exposure that can possibly show detail in all areas of the photo. Someone or some computer will have to decide what exposure is best. Camera manufacturers have created computer programs which reference thousands of sample photos to determine what kind of scene is in front of camera, so that a reasonable decision can be made as to what exposure to use. This program and the data from those thousands of sample photos sits inside your camera and works well, very well. But lets look at the two photos below:


I shot a series of 5 photos for the purpose of merging into an HDR image. Later I began looking at the individual images and picked out two exposures that I liked by themselves. You may very well like one of these images better than the other, but someone else probably prefers the other. The top shot emphasizes the fences in the foreground and allows the end of the alley to almost disappear into the light. The lower one shows more detail in the lighter alley end and looks more "realistic". I like both of these images and there is not now, not ever going to be, a computer that can pick the one I like best.

Both of these images were touched up slightly in Lightroom, but they are essentially different because of a one stop difference in exposure. Much more can be said about exposure and I'll probably be back to say some of it. If you want to improve your exposures, experiment.

Wednesday, July 25, 2012

Adding the Shadow to the Post Below

I promised to tell how I added the shadow to the post just below this one after moving the figure to make her apparently closer to the viewer. She was moved down and made larger, and she was removed from her original position. Now I added the shadow.
The finished photo to the right has the shadow added but how do you create a shadow? You know that the shadow is the shape of the figure casting the shadow and if we click on the eye of the Background layer (in the Layer pallet on screen right) all we have left is the figure as seen below. While your at it click to the right of the eye to be sure that layer is active.
Create a copy of this layer by pressing [Ctrl J], then while holding the [Ctrl] key down click on the tiny thumbnail of the figure in the layer pallet and it automatically selects just the figure and does it perfectly. Look near the bottom of the tool bar and you should see two overlapping small squares. The one on top should be black and the bottom one white. These represent the Foreground and Background colors and if they are not black and white just type the letter "d" and it will reset the colors to the default (B&W). Looking back at the image which is selected the keyboard shortcut [Ctrl Backspace] will fill the selected area with the foreground color, black, and you now have a shadow that looks like the subject. Of course it's currently on top of the subject and not on the ground where it belongs. Remember, last time, I used [Ctrl T] to call up the Free Transform function which allowed me to move my figure and re-size her. Here I do it again and this time I click on the top center handle (in the rectangle which appears) and drag it straight down and off the edge of the image until my "shadow" looks about like I imagine it.


Just two little details to complete the image. While were looking at just the shadow select Filter>Blur>Gaussian Blur and drag the Radius slider to about 10. Our shadow is now a little soft on the edges just like a real shadow would be.

Shadows are not black they are the color of whatever they fall on, just darker.  Over in the layer pallet bring back the eyes of the Background layer and the layer of our figure, then be sure that the shadow layer is still selected and at the top of the layer pallet find the word Opacity. Next to it will be 100%, change it to about 50% and you will be done.

OK two more really tiny things for closing in on perfection. The shadow will be at the top of the layer pallet. Click just past the name of the layer and drag it down below the layer that contains the figure. Now click on the figure layer and, using the Move Tool, drag the figure down just a little so it's on top of the end of the shadow just as is would be in real life.

I hope you've learned something here. Please let me know. Oh and here is a new final image that was created as I type the instructions above.