Wednesday, April 1, 2020

A Look at Shutter Speeds


A Look at Shutter Speeds

A few weeks back I looked at Apertures. This time I'm looking at shutter speeds. The range of apertures available depends on the lens you are using.  The range is to some extent, at least, dependent on how much you paid for the lens. Shutter speeds however, depend on the camera itself and you will have the same range for all lenses on that camera. One price controlled difference is that usually a more expensive camera will have a faster top shutter speed. Shutter speeds range from the fastest usually 1/8000 sec while less costly cameras fastest may be 1/1000 or 1/2000 sec. The slowest shutter speed built into the camera is, in most all cameras, 30 sec. In most cameras if you attempt to adjust the shutter speed to a speed longer than 30 sec your display will change to "bulb". The "bulb" speed will allow you to take exposures of any time length merely by pressing the shutter button down and holding it there. If you hold it down for 1 minute your shutter speed will be 1 minute. If you hold your shutter button down for a half-hour your shutter speed will be a half-hour. You can hold the shutter button down for any length of time. Since it is nearly impossible to hold the shutter button down without moving the camera (even on a tripod) most photographers use a remote shutter release. The remote can be connected by a wire or wireless and all remotes I have seen can be locked in the on position and will therefore not need to be held with your finger for long exposures. 

OK the above will give you an idea what range of shutter speeds to expect from your camera now let's look at what this means for the photos you take. In the manual mode longer shutter speeds mean a brighter image while faster speeds give a darker image. But let's make use of the cameras computer and set the camera to it's Shutter preferred mode. That's "S" on a Nikon and "Tv" on the canon. This mode will allow you to select any shutter speed up to 30 sec (bulb cannot be use in an automatic/semi-auto mode) your cameras computer will select both the aperture and/or ISO necessary to give you a normal exposure if that's possible. Usually a blinking number in your viewfinder will indicate that you have chosen a shutter speed which cannot be used in the current lighting or camera setting conditions.

Coming up a few photos taken at various shutter speeds to give you an idea of what kind of images you may create by using those different speeds.


Wicomico River, a 30 Sec exposure creates a ghostly look to the water.
Road Lights: Here a 10 Sec exposure shows trails of auto tail lights. Taking shots of lights will frequently fool your camera's automatic exposure meter so this shot was taken in Manual mode. A couple of test shots were taken to get a good aperture for the final shot.


Missouri's Current River Beach: Here a 30 Sec exposure was taken at night with a full moon behind the camera giving the impression of a sun lit afternoon. While I can't see them in this size image. When viewed full-sized I could see a few stars in that blue sky.


A 1/500 sec shutter speed froze my grand daughter in mid run and the soccer ball in mid-air above her head.


Back to a slower speed, a 1 sec exposure gives this angel hair look to a beautiful small waterfall.

Another 1 sec exposure taken on my deck. After pressing the shutter button I quickly zoomed the lens giving me a motion looking blur.


Another shot taken on my deck this time using that "bulb" mode, mentioned above that can be any length at all. This one taken in the dark with just a little light coming through that window on the right. Was exposed by a small flashlight that I was carrying which I used to "paint" each of the chairs and each of the plants, and a little on the rug on the deck. I then closed the shutter and looked to see what I had gotten. The total time was 71 sec. It's all based on guess work and may take a few tries until you get a shot that you like.


Tuesday, March 31, 2020

A Lightroom Technique You May Not Have Tried


 Complexifying Light

Let's jump into this post with That word in the title you may never have heard before, complexify. It shows on my editing screen with a red underline indicating that the dictionary has never heard of it.  I have heard the word used only in it's current context which is photo editing. While you may not have heard the word before it is pretty easy to figure out. It means to make more complex or more completated.

The photo to the right was taken some time ago and is an HDR image. It is composed of 5 exposures from 2 stops under exposed to 2 stops over exposed. Using Photomatix I attempted to create an image that looked realistic and similar to the way it looked to my eye at the time it was taken. I did a series of images of the Salisbury Maryland downtown and this was just one of those images. I looked at this shot many times and always liked it and began experimenting with what, to me, was a new technique in Lightroom "complexifying light".

One of the tools available in Lightroom on the Tool Strip at the top of the Adjustment Panel just above the "Basic" heading on the right side of the screen is the Radial Filter, the fifth tool which has the symbol of a plain circle. If your histogram is displayed, the Tool Strip is just below it.
In the Develop Module click on that Radial Filter then point to anywhere on the photo you are editing (for convenience, not too close to the edge) then press and hold the left mouse button and drag the mouse pointer diagonally. A circle or oval will appear. When you let go of the mouse button the circle, or oval that you have created will remain. One other thing that happens is the menu on the right appears at the top of the menu area on your screen. There is a group of 16 sliders that will look familiar to Lightroom users since all those sliders also appear in the Basic adjustments panel which has been temporarily moved down and now appears below the Radial Filter control sliders panel.

All of these controls work in the Radial Filter panel in the same way they work in the Basic Panel but they affect all areas of the image except what is inside the shape that you have created with the Radial Filter tool. In our current example we would like to control only what is inside the shape you have created and not the rest of the image. Near the bottom of this panel you will see a check-box in front of the word "Invert". Clicking the there will place a check-mark in the box and now any sliders you adjust will affect only what is inside your shape, not outside.

The slider above the Invert check-box, labeled "Feather" makes the change from the outside of your shape to the inside occur more gradually. Most of the time you would like the change to be gradual so try setting the Feather control to somewhere between 50 and 100 (I usually stay at or near 100).
Now, let's complexify the light. One way is to start by darkening the entire photo with the exposure slider moved to the left between 1/2 and 1 stop. Now look at your photo and find an area that is just a little brighter than the areas around it. Using the Radial Filter tool, click in the center of that brighter area and drag the mouse and maneuver it so that the entire brighter area is inside the shape you've created. Let go of the mouse button and adjust the Exposure slider to make your slightly brighter area to be just a little brighter than is was.

You have now complexified the lighting by making one area more different from it's surroundings than it was before you started. The lighting is "more different", therefore "more complex". Now select other slightly brighter areas and make them also brighter than they were. The difference should be subtle not obvious. Next we'll do the same process but, this time by selecting areas that are slightly darker and making them even more darker. You will have increased the contrast of the image but not everywhere, just in the places you have selected.

If you have been careful and made just small adjustments your image should now have more "pop".
If you start by darkening the image quite a bit darker and selecting and brightening  areas that would be lit at night you may be able to create a shot that looks like it was taken at night. This shot was taken in the afternoon of a cloudy rainy day which really helped by creating the reflections on the street.

Many adjustments can be made either inside or outside the oval you have created and you can make as many ovals as you'd like. You can adjust each one as you create it and make each one lighter or darker or make any other changes that are available in the sixteen sliders. You may want to search for instructions on the Radial Filter where you will find many more ideas for it's use.


Monday, March 23, 2020

A Look at Aperture

A Look at Aperture

I have not posted any new entries in this blog since 2014 but in our current pandemic state it's time for me to get my mind on something else and give any possible readers an opportunity to do likewise.

Since I've titled this "A Look at Aperture" let's start by seeing what aperture looks like. The word aperture literally means "hole", an opening. In a camera the aperture is behind the lens and back in the days of manual lenses you could look through the lens and see the aperture and it would look something like one of the following.


When the lens is wide open (in this example labeled f/2.8) it is letting in all the light possible for that lens. When the lens is what we call "stopped down" it looks more like the image labeled f/22 and is letting in the least amount of light possible for this lens. Modern lenses stay wide open all the time except for the exact instant when the photo is taken which allows the image in your viewfinder on a DSLR to be as bright as possible when you are looking through it, but it prevents you from seeing what the aperture adjustments look like.

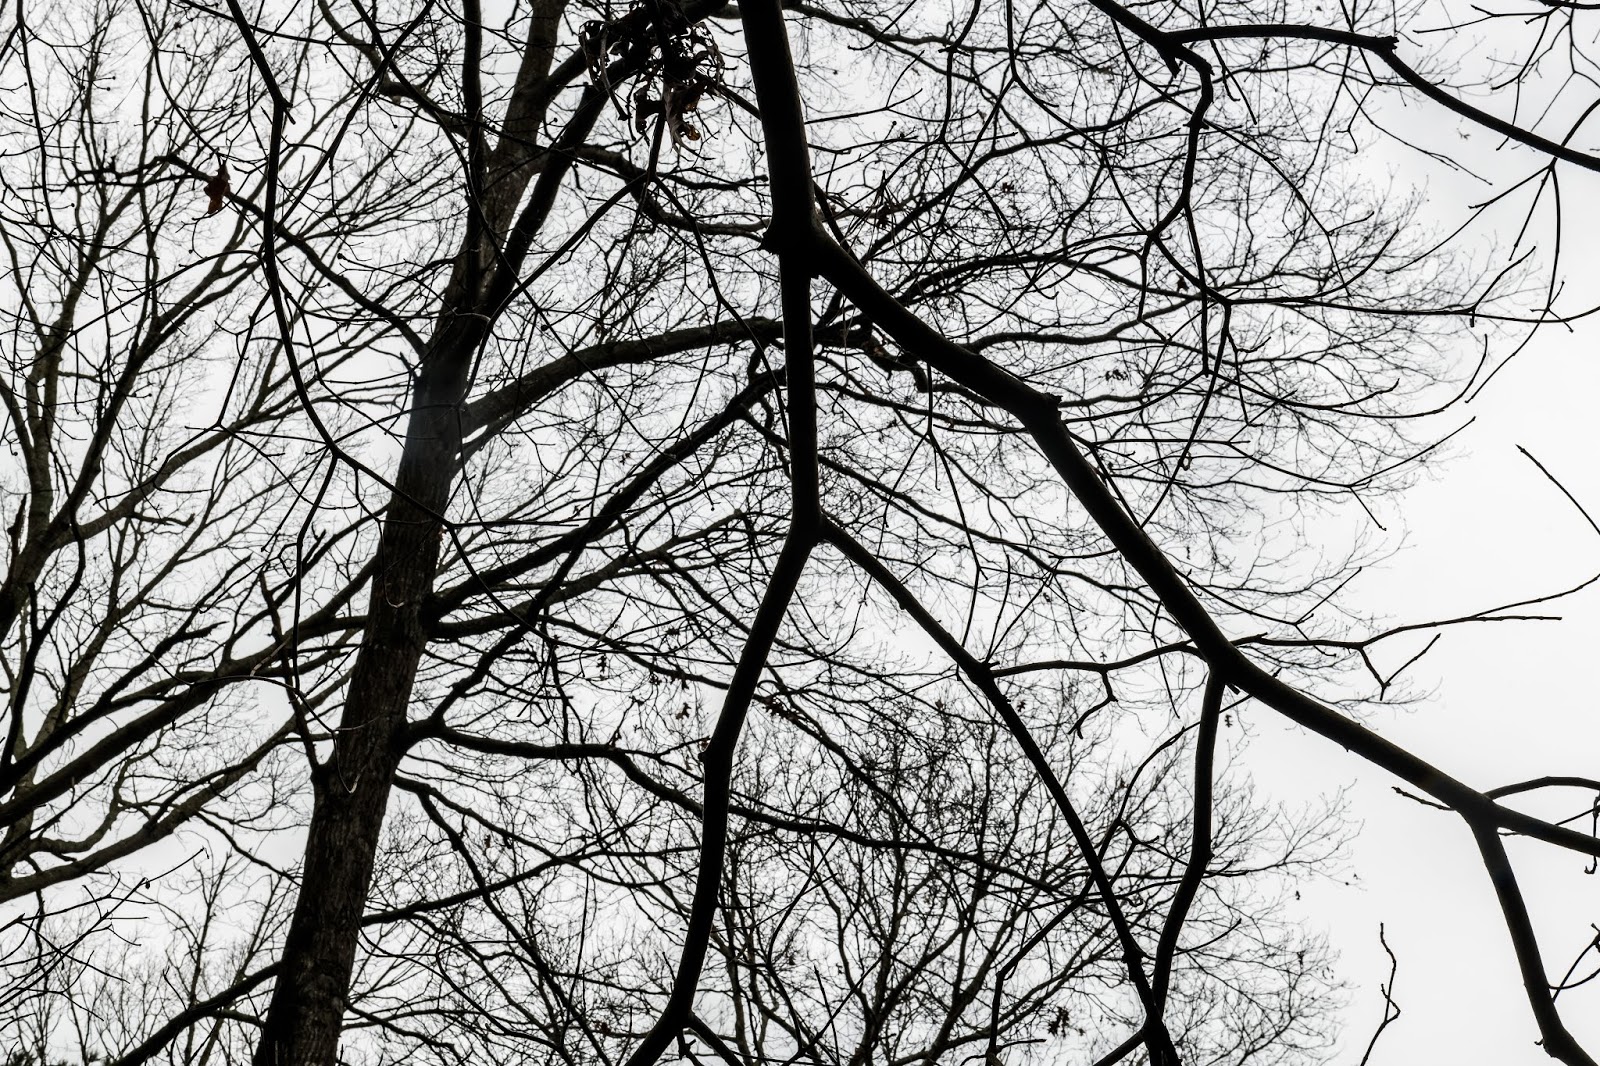
Now that we have all that out-of-the-way lets look at what happens to the image when you adjust that aperture. As I was sitting in my yard the other day, I looked up and saw the view below. I was looking through the limbs of a small Dogwood tree and seeing a large Oak in the background I got my camera and set it in the "A" mode (aperture preferred) which allows us to set any aperture we would like and then automatically adjusts the shutter speed to give us a good exposure. I set the aperture for f/22, that very small "hole" in the graphic above and got the first image.

Then sitting in the same spot I adjusted my aperture to it's largest opening which on the lens I was using is f/2.8 and look what happened. The small aperture had kept most of the image in focus so the close Dogwood and distant Oak both look quite sharp but the shot taken with the lens wide open, below created a very different effect. I was focused on the close Dogwood and the distant Oak is not in focus. Large apertures (which are the smaller numbers like 2.8) do not keep as much of the image in focus. What ever you have focused on (in this case the closer Dogwood) will be in focus, but anything closer or farther away will not be as sharp. In this case the smaller branches of the Oak blurred enough to disappear from the image while the trunk and larger branches are still visible but are not at all sharp.

This is the same effect photographers can take advantage of when shooting portraits. They will use a large aperture and focus on the eyes of the subject and the background (like the Oak tree) will be very unsharp which will cause their subject, still very sharp (like the Dogwood), to attract the viewers attention while making the blurry background seem unimportant and almost un-noticeable.

Your camera in it's fully automatic mode would most likely have given you the first image. There is nothing wrong with that photo but you could have created the second one if that's what you preferred. The difference is you can get what the camera gives you or what you would like. This is why so mucy time is spent in photo "how to" articles trying to get you out of the "automatic" mode. In this example I have used the "A" (aperture preferred) mode which is a semi-automatic mode which will get you a good exposure automatically, but allow you to pick the aperture that will create a look that you prefer.


Thursday, March 27, 2014

HDR or RAW?

 The two images you see here are very similar. If you look very carefully the photo below has more detail in the front doors than the one to the left. If I keep looking at larger versions of the two I would probably find other places where a difference was visible. Still if I decided to print one very few people would be likely to notice much difference. The image below is HDR created from 5 separate exposures while the image to the left is is the middle exposure of the 5 adjusted in Lightroom.
Below is the Basic Panel in the Lightroom Develop Module. All of the horizontal sliders start in the middle with the exception of the first two which are automatically set to the white balance as the shot comes from the camera. So if you have set the white balance or if the camera has done it for you in the automatic mode that is how it is set. You may change it if you like but in this case I left it as it was. I did think the image was a little too bright so I adjusted the exposure by minus about 1/3 of a stop, which is the -0.36 you see.
The contrast slider was not moved at all and remains at zero. The next four sliders were where most of the work took place. Here I usually start from the bottom up with the Blacks slider. Hold the Alt key down and when you press the left mouse button on the slider the image turns solid white. Slide the Blacks slider to the left until tiny bits of black or color start to appear and then stop.

Use the same procedure for the White slider. When you hold the Alt key and press the left mouse button on the slider the image turns solid black. This time you will slide the slider to the right until tiny bits of white or color appear and then stop this control. You have now expanded the tones of the image so that you have pixels that are as black as possible and some that are pure white.

The next control is Shadows and for this no Alt key is used. As you slide the control to the right darker areas of the image lighten and as you can see I slid it as far as it would go for this shot.

The Highlight slider when slid to the left darkens only the brightest areas and here I again went all the way, this time to the left.

As I was making these edits I was comparing them to the HDR image I had created first and was attempting to make it as close as possible to that image. You would not be able to do this with all HDR images. The light to dark contrast in this image was not extreme to start with and the HDR image was adjusted to look realistic. HDR software can bend the tones of an image so that normal editing could not possibly duplicated. Most HDR users prefer to keep the images looking realistic. I sometimes go for an extreme look.

The HDR image was created from five images processed in Photomatix and the editing of the single image was done in Lightroom 5. Photoshop or Photoshop Elements and many others could have been used. In these editors the Levels control takes care of the Whites/Blacks settings and the Image>Adjustments>Shadows/Highlights does what the separate Shadows and Highlights control does here.

One thing to note is that the original image was RAW. RAW images contain much more tonal information than JPEG images and give you more range in the slider adjustment in both Lightroom and other editors.

As usual please comment, and questions are welcome.

Monday, February 17, 2014

Background Lighting Trick


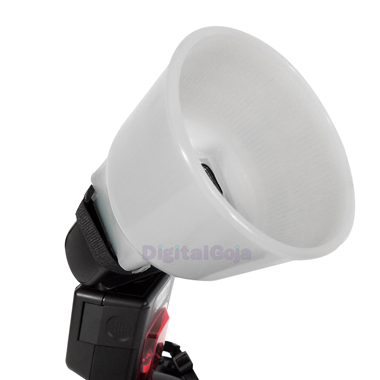
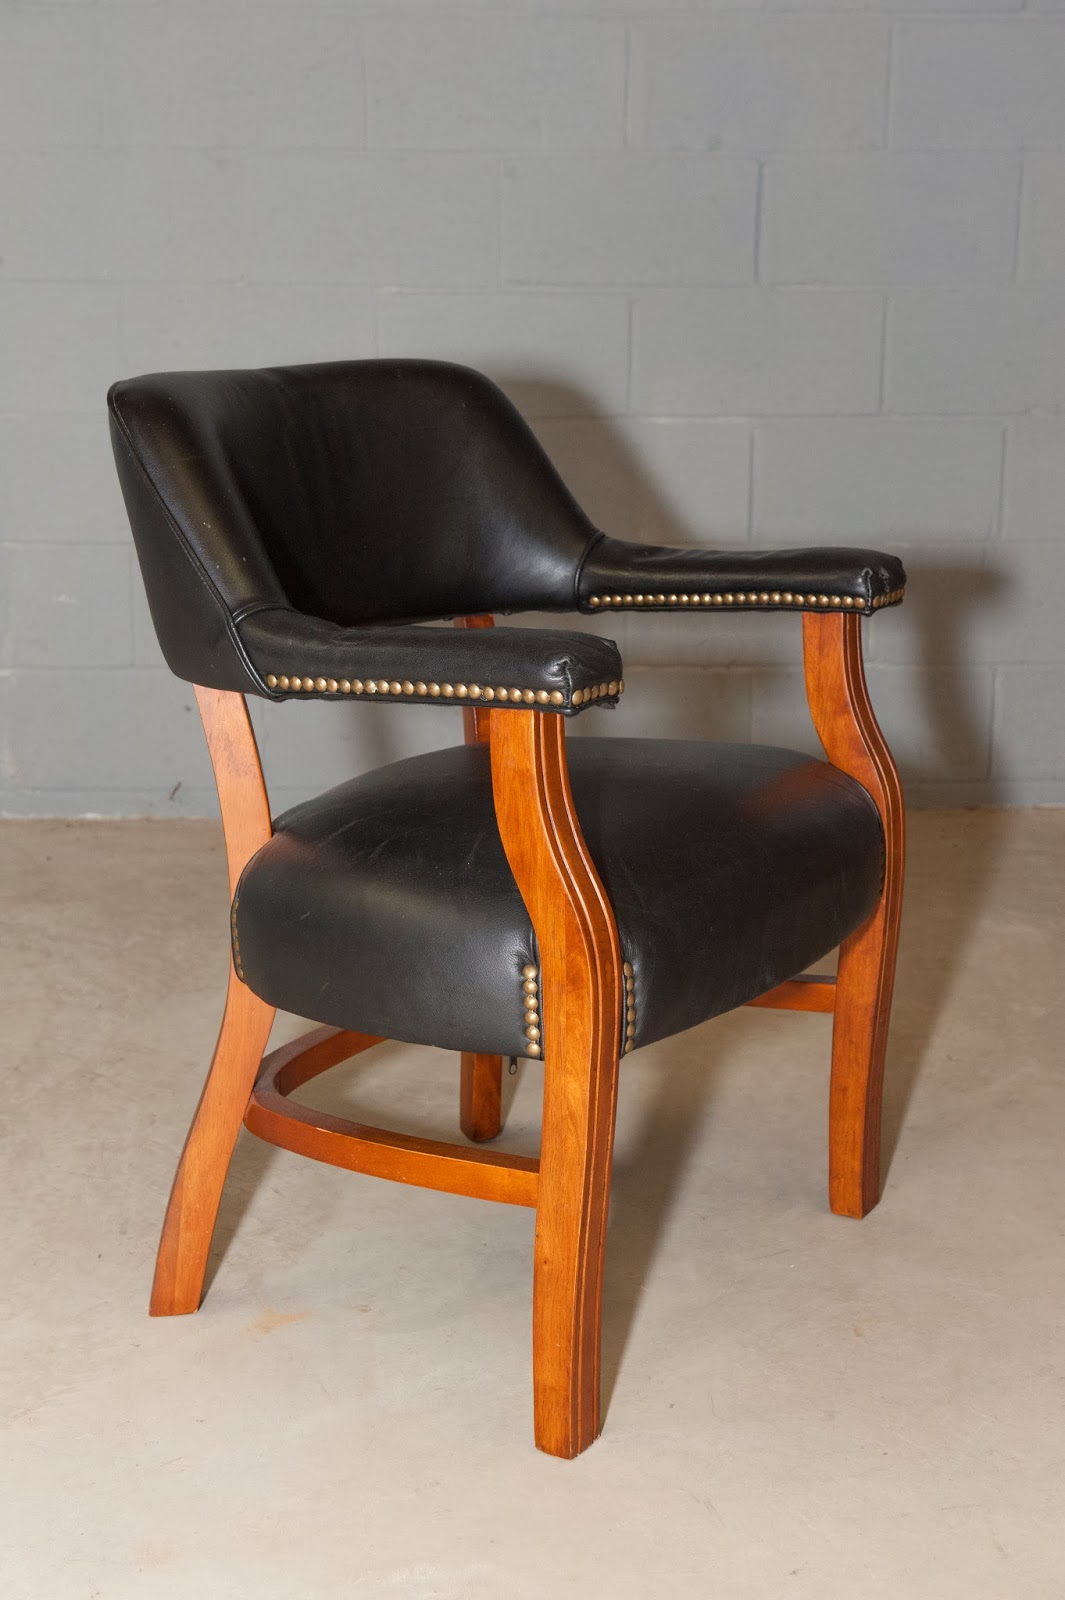
First I do have a simple studio in my basement but what I've done here is a shortcut to a quick shot. We have some chairs we wanted to list on a local "furniture for sale" site and my wife asked me to get a shot of one of the chairs. The chair was already downstairs so I moved it to the studio end of the basement. I had just purchased an inexpensive flash diffuser, shown here, which I was experimenting with and it happened to be on the camera at the time. In my camera's program mode I just took a shot and this is what I got. The chair is sitting on a concrete floor and the painted concrete block wall is visible behind it. OK it shows the chair but this is my studio and I wanted a little better than this. Of course I didn't like the shadows either.
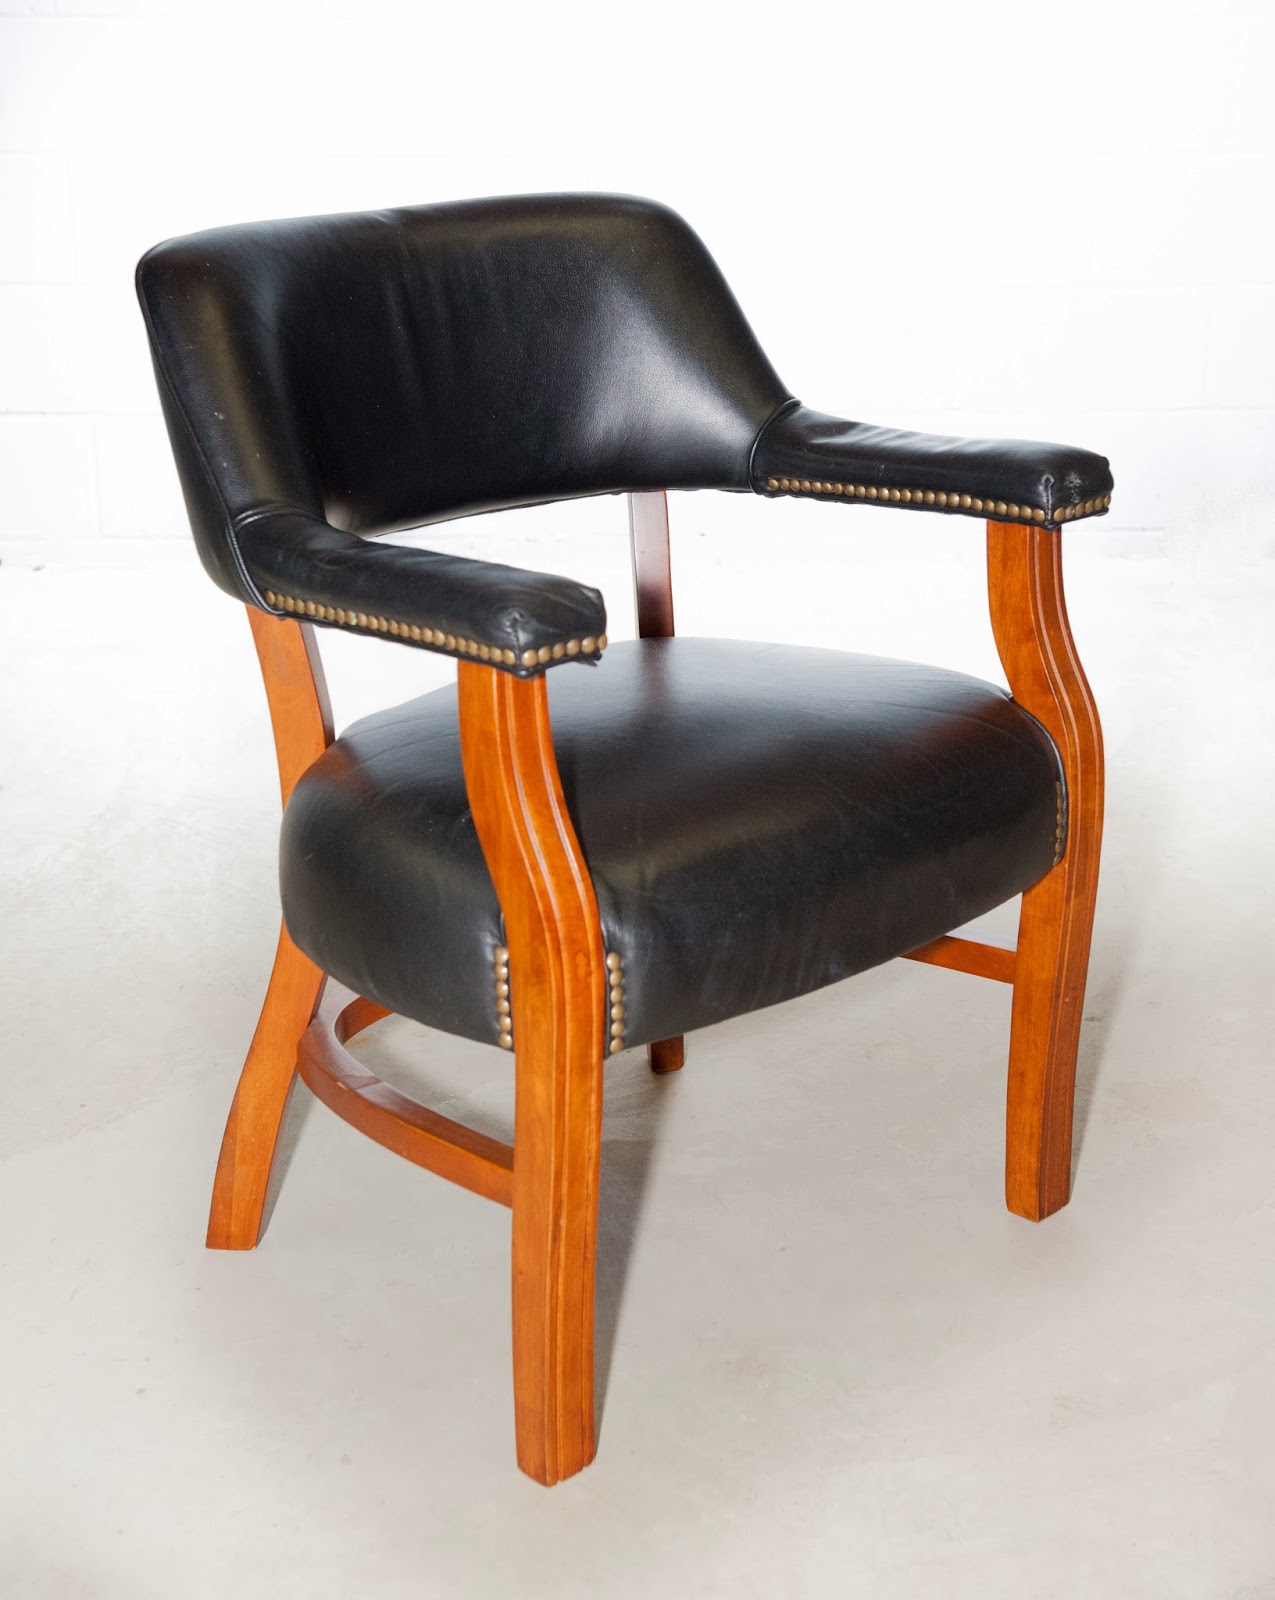
Sitting against the concrete block wall is a background stand that at the moment had a roll of black "seamless" on it (that's the wide roll of paper photographers use to create a smooth background). I wanted a white background but didn't want to take the time to change paper rolls so I was back to my grey painted wall. I pulled the chair a little farther away from the wall took my camera out of the program mode. My Nikon D700 will sync at 1/250th of a sec. but I set the camera at 1/200th to be on the safe side. I set the aperture at f/8 kicked up the ISO since I wasn't going to get much light from the new diffuser and fired a test, opened up to f/5.6 and shot again, not bad. The photo was pretty much back where I had started but in a manual mode. I have a small flash which is usually on a light stand with a 6 foot arm that will allow me to light from above. That flash has a sync which fires it when another flash goes off. Since it had no diffuser it was going to be a lot brighter than the flash on my camera. I raised it up and pointed it down aimed at the bottom of the wall. and set pretty low. Pop! 
The wall and the floor were over lit so there is no detail and no shadows. The grey wall and grey floor have turned bright white which is what I wanted. The shot you see here is what I got. If you want to set up a studio, an under lit background can be black, while the same background over lit becomes white, and lit normally it will look like what it really is. Don't start by spending a lot on backgrounds. I've collected quite a few over the years including black, white, blue, and grey paper. A grey/blue dyed wrinkled old bed sheet, and a grey painted 20' x 20' muslin drop usually used for shots of ballerinas who tend to spread arms and legs far enough to reach outside the limits of my 10' backgrounds.

Look again at the final photo for a moment. There is no visible bottom of the wall or edge of the floor. This is the effect that photographers get by using a roll of white "seamless" and pulling it down so that it curves smoothly and covers the wall behind and the floor under the item (or person) to be photographed. Here, just over lighting the background and spilling that light on to the floor I have created the effect of seamless in an unfinished basement.

Comments and questions of course are welcome.


Sunday, January 5, 2014

Photoshop Lightroom 5

The potential results of a combination of Lightroom 5 and a RAW image is nearly unbelievable.

Here is the original shot as it came from the camera, almost. The only edit was to straighten the horizon which was just a tiny bit tilted when I shot it. I shot using Aperture Preferred at f/11. What I wanted was a depth of field that would keep the image sharp from the grasses in the foreground to the horizon in the distance. f/11 would do that without causing diffraction problems. Stopping your lens down to it's smallest aperture (largest number) can create a lack of sharpness while a stop or so open from the smallest opening will allow a great depth of field without adding its own problems.

In one post I will not be able to do justice to what has happened in Lightroom but I will be able to give you an idea of what it is capable of and how easy it is to use. Look at the image to the left. First I'll go through the Basic Panel edits. No adjustments were made to the White Balance as it look good. The entire image looked a little over exposed so the exposure was dropped about 1/10 of a stop. Contrast was not adjusted. Highlights would normally be slid toward the left but because of a later adjustment were moved to +100. Shadows were left at 0. The White Slider was moved up to +62 to expand the brightness of the whites and the Black Slider to -62 to increase the richness of the deeper colors. The fact that those numbers are the same is purely coincidental. By holding the ALT key with the White Slider the screen turns black and the slider was pushed until the first specks of white appeared. Likewise holding the ALT key with the Black slider the screen turns white and the slider was pushed left until a few small areas of black appeared in the shadows along the edge of the grasses.


In the bottom section of the Basic Panel labeled Presence the Clarity was increased to +12 which enhances the apparent sharpness in the mid range of tones and gives the photo more "punch". The colors were somewhat flat and sliding the Vibrance Slicer right to +33 solved that problem. I don't often use the Saturation slider and didn't here.

Just above the Basic Panel is a small toolbar from which I selected the vertical rectangle which is the Graduated Filter. The mouse pointer becomes a small cross which I moved to just above the horizon line about 1/2 inch and click ad dragged it straight down until it was about 1/2 below the horizon. Any adjustments made now affect only the area above the horizon. A new series of sliders appear and I moved the exposure slicer to - 1.5 stops to darken and enrich the sky and clouds.

This created a new problem. Since some of the grasses are above the horizon line they also got darkened and did not look realistic. This time from the toolbar I selected the last tool to the right, the Adjustment Brush. With it I painted the grass area that had been over darkened and with the sliders which appeared above the Basic Panel I adjusted the Exposure to + 1.5 stops which undid the unwanted -1.5 stops that was done by the Graduated Filter.

In this image no Tone Curve, HSL, or Split Toning were applied. Frequently HSL is a great help to the sky but we'll save that for another post.

In the Detail Panel only two adjustments were made. The amount was moved to 75 and the Luminance was set to 50. One final adjustment, which I usually make first, is in the Lens Correction panel. Place a check-mark in the Enable Profile Corrections box and one in the Remove Chromatic Aberration box.

That's it! The total time was less than 10 min. probably closer to 5. Of course it will take longer the first few times but I hope you like the looks of the corrections. I did go even further and in a later post I'll pick up where I left off and make a few more changes.

Comments and questions are welcome as always.


Friday, December 27, 2013

Explosive Photo Editing

With a combination of camera features, lens choice, lots of practice, and more than a modicum of good luck I got the shot to the right. To freeze that ball I used an ISO of 3200 which on the Nikon D700 has a reasonable noise level. I had the camera set for A (aperture preferred) with the aperture set wide open at f/2.8 giving me a shutter speed of 1/6400 sec.

For the explosive photo editing to come, freezing the ball is not required but that and the fact that I caught the ball in the very center of the shot is what led me to us the method that follows. If the ball had been just a few inches higher or my granddaughters bat had been a smidgen lower she might have actually hit the thing, but were talking photography her not scores and she has hit many of those bright yellow-green softballs.

I've talked about Lightroom several times in this blog but the technique described here cannot be done in that application. What we are about to look into requires layers and Lightroom does not allow working on layers. The photo was actually edited in Photoshop but the exact same steps are available in Photoshop Elements and they work the same way and just as well. One difference is that the Photoshop version was processed in 16 bit mode and the Elements version had to be reduced to 8 bit mode to complete the steps. I may need to get back to this bit depth later but for now I'll just mention that almost everything you do with an image is done with an 8 bit version. Larger bit depths help during the editing phase.

The first step is with the original image and it can be done in Lightroom or any other editing program. I cropped the photo to the square shape putting the ball in the center and made minor adjustments to the brightness, sharpness, contrast, and vibrance.

Once I liked the original image I moved to Photoshop and copied the background layer. Now I had two identical layers, one on top the other and I was ready to start. At this point in either of the Photoshop programs select the Background copy layer if necessary, then from the menu at the top of the screen choose Filter>Blur>Radial Blur. A small window will pop up. First choose the Blur Method by clicking on Zoom. Under Quality select Good and at the top move the amount slider to about 60. Note that there is no preview of the blur just a graphic representation of how much stretching can be expected. Click OK and the blur will be applied to the entire image including your subject. At the bottom of the Layers Pallet (top in Elements) click on the "Add Layer Mask" the little rectangle with the circle in the center. A White square appears along side the thumbnail image on the background copy layer which is the blurred layer. Click on the white square then press the letter "b" on the keyboard which will select the Brush tool. Hold the Brush over the ball and adjust the size by pressing the right bracket key "]" to make it larger or the left bracket "[" to make it smaller until it's the width of the bat or the size of the ball and click and drag the brush over the areas of the image you wish to be sharp. Note that I have painted over the ball, bat, face, and part of the arms of my subject. When the photo looks like you want it to your finished. Above is my "Explosive" result.

I hope this works for you, Comments and questions are welcome.

Tuesday, October 1, 2013

Shooting Sports

We're not talking NFL here but kids playing a great game. Look at the first photo.
If you've seen great sports shots they are frequently tack sharp players against a very soft background. The players stand out and the background shows enough detail to let you know  what kind of place the  shot was taken in. Here a grass field with a parking area visible in the background. The autos and surrounding shrubbery are soft enough to let the sharp players stand out. The players are moving but are sharp. With a modern digital camera and a reasonably long lens these shots are not hard to get.

 If you're not sure what settings to use when you start this kind of shooting let's explore the settings I use and look at the reasons why. 
You can set this up before you leave home and be ready to shoot without carrying a list and trying to do this sitting on the sidelines. As you become more familiar with your camera these settings are very easy to make quickly in the field but this time just sit down in a comfortable chair and put the camera in your lap. Ready?

If your camera has interchangeable lenses and you have more than one lens find the longest one and put it on. This may be a 70-200mm or 18-300mm or one of many others. Here we are looking at the large number and we want the lens that has the largest large number, usually 200 or 300. If your camera does not have interchangeable lenses you can zoom your lens to the end that gives you the largest or most close up view and if you've put a long zoom lens on your camera you'll want to zoom it to the longer end also.

Now, the mode. Usually a dial on the top of the camera allows you to select the mode. This is the dial that allows you to select portrait mode, action mode, scenic mode and others. Frequently it's set to Auto or the green camera mode. If you haven't used them there are some very useful modes labeled M, A, S, and P. On the Canon they are M, Av, Tv, and P. For our sport shooting setup let's choose either A or Av which allows you to set the aperture and will automatically set the shutter speed for you. Since we would like sharp images and a soft background we'll use the command dial to set the aperture to the smallest number your lens will allow. This may be 5.6, 4, 3.5, 2.8 or something else but as you turn the dial you want the smallest number it shows.

The next setting to make is the ISO and since we will be shooting a fast moving target and would like a fast shutter speed we want to set the ISO a little above it's lowest setting. Usually the ISO settings are 100, 200, 400, 800, 1600 and sometimes even higher. This time try 400 or 800. I've assumed the game is going to be in daylight.

Now comes focusing. Your camera usually defaults to focus when you press the shutter button half-way down and as long as you hold the button half-way down the focus stays locked. For moving subjects we want the lens to continually refocus to keep a moving subject sharp so set your camera to the "Continuous Focus" mode.

If your camera offers a continous shooting mode where holding the shutter release button causes the camera to shoot 3 to 6 photos every second, you may want to try this also. I usually depend on one shot at a time but I occasionally do use the continuous shooting mode.

And that's it. When you arrive at the game, point your camera to the field where the action will be and look through the viewfinder. Most cameras will display the current shutter speed there. You want the speed to be 1000th of a second or higher. If it's too low readjust the ISO to the next higher number and check it again.

In both of the included images the players are sharp even though they are moving, and the background is soft (blurry). Next time you are trying to be a sports photographer give these ideas a try and post comments here to let others know how it worked.

Wednesday, September 25, 2013

Infra Red Photography

Infra Red photographs are taken using only infra red light. Since human eyes cannot see infra red light we are then taking photos with invisible light. The first question that occurs is "How do we do that?". Before digital photography it was done with specially created infra red film. Because the film was sensitive to invisible light we had to load the film into our cameras in total darkness. I carried a light proof bag with sleeves for my arms. The camera and film were zipped into the bag, then I would insert my arms into the sleeves, open the camera, and load the film by feel.

With digital cameras it is both easier and more difficult to create infra red images but before that description let's take a look at the result. The first image shows the basic idea of what you get. First the image is usually a black & white or monochrome image. In film days that was the only possibility. The chlorophyll in green plants reflects a lot of infra red light and the blue sky shows very little therefore, as you see, the sky is nearly black and the trees appear to be snow covered. White clouds also reflect infra red and they appear very bright. The overall effect is a high contrast dramatic image.

So, how do we do this with a digital camera? Well working on our side is the fact that digital sensors are very sensitive to infra red light. This creates a problem for camera manufacturers because the sensors are so sensitive to infra red light that the camera's photos would not be good at all, so the maker has to put a filter in front of the sensor to block infra red light. This is great for regular photography but not for us if we want to take infra red (let's say IR from now on) images, so what do we do?

We need to purchase an IR filter which allows IR light to pass through and blocks almost all visible light. I can take my IR filter and hold it in front of my eye on a bright sunny summer day and I see nothing at all. It is completely black. If I look directly at the sun (very briefly please) I can see the sun but that is all. IR filters vary widely in price depending on quality and upon exactly which areas of the IR light are blocked and which are allowed through. Here my advice is to start with a less expensive one since you may find it works better for you than a very expensive one. That is difficult to explain but still true. My first digital IR images were created using a Kodak gelatin filter that I got for about $30.

With the filter on your camera you can see nothing through the viewfinder or the live view screen so you will have to focus first (oh, you MUST have a tripod). Once you have focused and put the filter in place you will have to experiment with exposure. My first shots using a small point-and-shoot camera were about 30 seconds long on a bright sunny day. The blocking filters on cameras have gotten better so you may have to go 45 to 60 sec. Your first test exposures are a "crap shoot" strictly a guess. If it's dark go longer if it's too light go shorter. In a few minutes you should have a decent shot.
Now here comes a surprise. The photo is not black & white. Since we are using a camera that separates red, green, and blue, the infra RED light we are using exposes the red pixels more than the green and blue so we have a very pink image.

Before we go any further I'll mention another way to create IR images. My first digital camera was a Nikon D100. When I upgraded to a D200 I kept my 100 as a backup and found I didn't use it. It laid in my camera case but never came out. An internet search revealed that there were quite a few companies and individuals out there who would convert digital cameras to IR cameras. They remove the IR blocking filter from the sensor and replace it with a filter that blocks visible light (similar to the one you use in front of the lens). Now that the blocking filter is removed your exposures are almost the same as a normal color camera and you no longer need a tripod and extremely long exposures. Remember you cannot take normal color photos with this camera any longer; it's IR only. Another warning: your meter will work but it will not necessarily be as correct as it used to be and you will find yourself compensating for images too dark and too light as you go. I found the cost of this conversion ranged from $100 to $400 and I advise you to research the provider before you send off your valuable camera and money. I would highly recommend the guy who did mine but he no longer does the modifications so you are on your own there.

Back to pink images. because infra red is closer to red than green or blue there is an over all pink cast to the images. There is more exposure to the red pixels than the green or blue BUT the green and blue get some exposure also and you can leverage this to create "false color" images. This is way beyond this post but fun to do.

Any photo editor will allow you to reduce saturation and create a black & white image. In Lightroom I adjust contrast highlights, shadows, blacks, and clarity, but in any editor you will be able to create a decent monochrome image. I chose the image you see here for a couple of reasons. First you can see that IR does not penetrate fog and by shooting this particular image in IR the grass and the sky are both light and the dark slacks and hair on my model stand out clearly.


If you like the effect, give it a try. There are many websites devoted to IR photography with detailed advice on how to get 'er done. As usual comments and questions are welcome. I promise to read and answer but I am sometimes slow so please excuse me if I seem unresponsive.

'Til next post: Keep Shooting.
Jim

Tuesday, September 10, 2013

How High is Your Camera?

No, I'm not asking if your camera has been exposed to cannabis or some other hallucinogen, I want you to look at some of your photos and estimate how far your camera was from the ground when you took the shot. Now take a tape measure and see how far your eyes are from the ground. Do you notice a similarity to your photo estimate?

Bottom line here is that most photos including a very high percentage of amateur  photos are taken by a standing photographer with the camera held at eye-level. With the advent of cell phone cameras there has been a jump of photos shot by a sitting photographer but I think you'll find most of those taken at the eye-level of the person sitting across from them at the table.

So what difference does it make? Elevation is a key to controlling the background. In the included image I found myself with a very photogenic boat filled with flowers, a nice piling arrangement and a beautiful blue sky with fluffy white clouds.
My problem was including all of those items in the same photo. Shooting from the aforementioned eye-level would have created a shot of the flowers but not much of the boat and a not-very-pretty shot of the pilings. The background would have been the lawn which at this time of the year was not a lush green.

By lying on the ground and using the 24mm end of my zoom I was able to feature the pilings, include the boat from an angle with included both the form of the boat and the flowers without more green than flowers, and include the sky as a primary background with visible clouds but a plain blue sky behind the pilings.

In this case I chose to create an HDR image with 5 shots but since I had a polarizer on my lens to pop up the sky I have a nicely exposed image that would stand well without the HDR. Comparing the two shots side by side I thought the HDR shot had the edge so I included it here.

I remember a shot I took several years ago in Ottawa, Canada that I can't seem to locate now in which I was shooting one of the beautiful government buildings from across the street in front of it to get the building arranged as I wanted it. A standing up shot included the street and its traffic, but at the edge of the grass area on which I was standing was a border of a flowering hedge.  By sitting on the ground I was able to hide the street and the traffic behind the hedge and create a nice bottom border of flowers for the building and hide what I didn't want in the photo.

At the other end of the scale there is the hail Mary shot which is taken with your arms extended above your head and the camera aimed (by guess and experience) at your subject. With this you can get over people and objects near you and if you are aiming down use the ground as a background which may be a nice uncomplicated way of simplifying your image.

Remember try higher and lower instead of always shooting at eye-level, and... good shooting. Again comments and questions are welcome, but sometimes I forget to check for a few days so don't panic.

Tuesday, September 3, 2013

The Camera is Wrong Again

 Touring a reproduction U.S. Civil War display I spotted a tent in the style of the times and tried a camera metered exposure shot. I wanted the fence in the photo and this first image is what I got. The tent was in brighter light than the fence and the surrounding foliage. While the tent was near the center of the photo it occupied a much smaller area than the remainder and look what happened. The tent is very washed out looking and has very little detail. The fence and foliage look fine but the tent was my main subject. There is no single, best way of approaching the problem. Let's look at one way.


Move in and isolate the tent. Now try an automatic exposure and see how it looks. In this case it was still too bright so I noted the shutter speed, 1/60 switched to manual mode and set it faster, 1/250 and got the exposure of the tent that I wanted and here is that shot.


Now I back up and use the same exposure and I have my original scene with nice detail and texture in the fabric of the tent.


Now a new issue is that the fence is a little darker than I would like so lets examine some possible corrections. An on-camera flash could provide fill, but the closer part of the fence on right would be brighter than the more distant fence portion on the left. So let's do the simplest solution in post (that's shorthand for post processing).

And, here we have the final version. Using Lightroom 5. (Earlier versions and most any RAW converter will work also. Even Photoshop Elements has a shadows/highlights control that will work fine.) In Lightroom I just lightened the shadows and most of that effect was on the fence. Left is what came from my decisions.

It took longer to write it and even longer for you to read it that the taking process actually took. The shot was taken in less than a minute and worked quite well.


Again comments and questions are welcome.

Jim

Monday, September 2, 2013

What Your Camera's Meter Doesn't Know

Your camera does not know what the scene looks like to you.

In the first example I set my camera in P mode. If you are not familiar with the various settings on DSLR cameras "P" mode is almost fully automatic. However unlike the Auto, or Green Camera mode found on many DSLRs the P mode allows you  to control ISO settings and it allows what is called, exposure compensation. Usually controlled with a small button marked with plus/minus signs like this [+/-]. Let's look at the first shot, fully automatic, and it's not bad. Notice the light range is so great that the trees and foliage are rendered as silhouettes. It is obviously sunrise/sunset (actually, sunset I'm not usually an early riser) there is good color in the sky and as I said before it's not bad, but it's not what I saw. By the time I shot this photo the world, locally, was pretty dark, the sky was not the pale blue you see here and the reds and oranges were much more vivid.

So, let's get back to "exposure compensation". The scene I wished to photograph was the one I saw before me. It had richer colors than the automatic one and more texture in the water. In manual exposure mode I could have used a faster shutter speed or a smaller lens opening. In the "P" mode I can use the +/- button and dial in the amount of over or under exposure that I wanted. Here in the second version I dialed in -2 also referred to as -2EV (Exposure Value). It is now 2 stops underexposed from the meter reading.

Please keep in mind that the meter reading does not give you a correct exposure, THERE IS NO SUCH THING AS CORRECT EXPOSURE. I do not even claim that the exposure in the second version of the shot is better than the first one, my only claim is that I like the second one better. I am the photographer and I get to decide what exposure I like best. Had you been standing beside me at the time this shot was taken and taken your own it might look quite different. Hey, I might even like yours better than mine.

Photography is based on artistic decisions. Knowledge of photographic techniques equips you with the tools you need to get the shot you want.

It's been awhile since my last post and it feels good to be back typing. Comments are always welcome.

Friday, March 15, 2013

Combined Techniques

Let's put together two photo techniques and see what happens.

The last post here was about creating a panorama. Back in August of 2012 I did a post on HDR, or High Dynamic Range, photography.

In creating a panorama two or more shots are assembled into an extra wide or panoramic image. In HDR photography two or more different exposures of the same image are put together to create an image with detail in all areas including portions of the image that would be too bright, or too dark, to include detailed information.

So now let's combine the techniques and create an HDR panorama. In this case I pointed my camera at the left end of the about to be created panorama and took five images at five different exposures. Moving to the center of the future panorama and being sure to overlap the first shot series, I took another five exposures from way too dark to way too light. Moving right I repeated the procedure for the final shot.

Now I uploaded all 15 exposures to my computer and started to work. I selected the first five images and exported them to Photomatix Pro and created an HDR composite. With the next five I repeated the process using the same settings to create the same effect and then did the same once again for the last five.

Now with three HDR images in my Lightroom organizer I selected them and selected "Merge to Panorama in Photoshop" and here is the result:


I enjoy creating HDR photos and also panoramas. I have contemplated putting the two together on several occasions but had not stopped and said OK, now is the time. Well then came four inches of rain and the creek in my back yard looked more like a river (to me) and I decided now is the time.

Still I cheated. I used the Program Mode and a five shot automatically created bracketing series in Nikon's Continuous High shooting mode, where the camera takes one exposure at the meter reading, then at one and two stops less and then one and two stops more. In Continuous High mode this takes less than a second on the Nikon D700 and was done hand held. Here, as in the processing described above, I repeated the same steps twice more and the shooting was done.

Photoshop had no trouble matching the images. Since I was standing quite close to the creek the curve is exaggerated but since there really is a curve it looks nearly the same as real life. Sometimes I'm pleasantly surprised by what happens even when I take shortcuts I know I would be better off not taking.

Give it a try, surprise yourself.

Tuesday, March 5, 2013

Shooting a Panorama

A panorama is not difficult to shoot. Many current cameras have built in assistance for doing them and several allow you to point your camera at one end of your panorama, press the shutter button, and sweep across the scene until you reach the other end, stop and wait a few seconds and your panorama is complete. Heck my phone does that. OK, my phone does a pretty poor job of doing that. You might substitute another word for pretty if your not blogging.

Here I'll describe doing it the old-fashioned way, like we did it way back in 2008. You might have noticed in a post a few days back that it's not a new idea. The shot here was from about 1976 and if your familial with Salisbury Maryland this is the back of downtown and a parking garage in the right side of the photo has not yet been built. Technology wise this is an amalgam; the shots were done on black & white Tri-X film and were, just a few years back, scanned into digital files and stored on my computer. I found them recently and told Photoshop CS6 to create a panorama for me and voila a panorama.


Most panoramas today begin life as digital images and what follows will assume you have either a DSLR or another digital camera that you can control manually. As I mentioned in an earlier post the reason manual control is needed for panorama photos is that they are made of several separate photos and when assembled as you see here they should appear as a single image. A single image has a single exposure, a single white balance, and a single point of focus. If you use your camera in a automatic mode all three of those things may change with each shot. Now that I've said that I'll say that if you took your photos in a automatic mode today's panorama creating software may very well do a great job of putting them together, but here on Jim's Photo Stuff we are going to be more careful so we'll use the Manual Mode.

Step one, of course, is to choose what you are going to shoot. The method we will be describing will work best if there is nothing very close to the camera. If you want that kind of shot we'll discuss some more techniques down near the bottom of the post.

I have gotten very good results creating panoramas with my camera hand held, but I do recommend a tripod if one is available. If I am shooting hand held I face the end of my panorama and line up the camera for the last image, then I twist my body until I can line up my first shot. Now I take the first shot and slightly untwist to prepare for the second shot. You will want the shots to overlap by about 1/3 so there will be plenty of area for the software to create a good alignment. Untwist some more, take the next shot and so on until you take the last shot. It is important to keep the camera level for each shot. Pointing down or up will create a curved image which doesn't usually look as creative as it sounds.

If you are using a tripod, level your camera and turn it left and right deciding where the image will start and where it will stop. In the hand held description I did not mention exposure, white balance, and focus, but I will cover them here and you will use the same procedure whichever method you choose.

Set your camera in the Manual Mode and look at the panorama you've planned. Do you see a brighter area and do you see a darker area. You are looking for an area that is in between, not the darkest and not the lightest. Set your exposure for that area. Be sure your focus is in manual mode and focus on a point roughly 1/3 of the way into the shot. Take your white balance off automatic and set it to the current conditions such as daylight or cloudy. Now take all the images you planned being sure to over lap them by about 1/3.

If you would like to include items that are relatively close to the camera pay attention here. The image to the right shows the type of path your camera will follow if you hold it in your hand and twist your body as I described above.


In the second image you will see how your camera will move if the panning is done on a tripod with the camera attached the way cameras are usually attached. The camera pivots around the point on the camera body where the tripod screw attaches.

Now for the optical purists and the people trying to include items near the camera and far away lets look at the third image. You will need to purchase or "home brew" a panoramic head for your tripod. A panoramic head allows the camera to slide backward so that the point of rotation is not under the camera body but under the lens and specifically under what is called the nodal point of the lens. A search for panoramic heads or panoramic heads diy should provide you with enough information to spin you head as well as your camera, but if the regular tripod method is not giving you correctly aligned images this may be your answer.

You're not done of course you now have the shots but no panoramic image. Upload your panorama pieces to your computer in the usual way. Now since my typing fingers have exceeded today's mileage allotment we'll be back soon with what to do now.

Thanks for reading.
Jim King

Monday, March 4, 2013

The Manual Mode

In my last post I nearly ranted about the Program Mode. And that, seriously, is the way I shoot. I try to use the camera's computer to do the hard work, fast. I did mention that their were situations which require using the manual mode and I'd like to tackle some of them here. I say "some of them" because as I go I'll probably think of more and more, but as a percentage of shooting situations I think those that require Manual Mode are a fairly small percentage (I may change my opinion on that as I go, but I don't think so).

Baseball under lights (Little League) My experience has been that Little League fields are lit well; this is not pro ball where the fields seem as bright as daylight but, kick up the ISO to 800, open the lens wide, and you can get shutter speeds of 125th of a second. What is difficult to get is consistent exposure. The background for a specific shot may be bright dirt around home plate, mid tone grass in much of the field, or black sky behind a low angle shot. Each one of these situations creates a different exposure and your subject (a player) may be exposed properly, or be under or over by a stop or more. Since the fields are lit quite evenly you can try several exposures manually until you get one you like and stick with it. The players are usually lit the same wherever they are. I find in the deep outfield I may need a stop more and I can set that on the fly quickly.

Followed the same rules with b&w film in the mid 70s.
Panoramas A panorama is composed of several shots, at least two and maybe eight or more. Let's say we take 5 photos that we plan to combine into one panorama. If the exposure changes between each shot they will be hard to blend together. Moreover if the white balance changes, or the focus it can be difficult to create the final image that looks like one photo. So here is the second occasion that Manual Exposure is, if not absolutely necessary, is a far better way of creating the necessary images to blend into a panorama.

Night Sky Taking a photo of the stars in the sky is relatively easy in the Manual Mode and virtually impossible in any automatic mode. Here's how to make a first try. After dark set your camera up on a tripod and aim it at the area of the sky you'd like to try first. A small flashlight will come in very handy.

  • Set your Mode to manual
  • Focus to manual
  • ISO to 400
  • Aperture to it's widest opening (smallest number)
  • Focus at infinity
  • Shutter speed to 30 seconds
  • Shoot

You can't do that in an automatic mode but it will probably give you a good start for your first night sky shot.

Studio Photography This topic is way beyond the scope of this post but traditional studio photography uses flash studio studio lights. The shutter speed is normally set to the "sync" speed of the camera, maybe 1/250 sec. and the aperture adjusted for correct exposure. If neither the lights or the subject moves all exposures will be identical. Auto exposure will not work with studio lights. (Studio is studio, dogs are allowed.)

Multiple flashes can be used fully automatically if, as an example, you purchase all Nikon Speedlights and operate them with Nikon's CLS flash control system. Canon and others have similar systems and some after market manufacturers sell flashes that are advertised to operate with this system.

Multiple Flash (the inexpensive variety) Another method of studio style lighting can be done with relatively inexpensive flash units that are, like Nikon Speedlights, designed to fit on top of a camera. This is done in exactly the same manner as studio photography above and the camera is in a fully manual mode. In studio situations you can use auto-focus if desired.

Groups of Similar Photos to be Displayed Together Here an example might be several photos of the same child playing in the back yard. In an automatic mode the skin color and tone as well as the appearance of clothing can change in a disconcerting manner between photos. Manual Mode will solve this problem.

Of course some experienced photographers use manual exposure all the time. With practice it can be very fast and easy. I will still save it for those occasions when I feel it's necessary and use Program Mode most of the time. This is a topic that can create a discussion similar to the Nikon vs. Canon wars that occur among photographers. I don't claim to have the best answer, but the one that works well for me.

Since I've posted a taste of using the Manual Mode I believe I've planted a seed which I may try to grow in coming posts. Perhaps the Muse is with me.